Joomla is an open-source Content Management System (CMS) launched in 2005. About ten years ago, the software was in the race for the title of most popular CMS in the world. Back then, there wasn’t much separating Joomla and WordPress – the current market leader.
Nevertheless, Joomla’s flexibility and advanced user management features still power quite a few famous websites, including the pages of Roger Federer, Nintendo, and ITWire. Today, we’ll show you how you can start your own website with the versatile CMS.
Table of contents:
- Purchasing a Hosting Account and Domain Name
- Joomla Installation and Setup
- Getting Familiar with the Joomla Basics
- Selecting your Template
- Installing your Theme
- Customizing Templates
- Joomla Extensions
- Joomla Modules
- Positioning Joomla Modules
- Creating New Articles
- Adding Articles to Navigation Menus
- Conclusion
- FAQ
Purchasing a Hosting Account and Domain Name
Getting online, you need two things to start with – a hosting account and a domain name.
Web Hosting
Joomla doesn’t have any specific requirements apart from PHP support, so it will easily run on most servers. Still, it pays to contact your potential host and double-check before you commit to a purchase.
Next, you have to ensure the chosen hosting plan will be optimized for speed and reliability. Website performance is crucial not only for the user experience but also for the website’s SEO ranking.
Choosing an affordable shared package might sound like a great deal for starters but make sure to how much resources and security you’ll need before you jump to this solution. For a more customized and secure environment, you are much better off with a cloud VPS package.
Domain Name
Choosing the right domain name is essential for your future brand. This is the name that all users will type to connect to your website so make sure to pick a domain that is unique, memorable, and recognizable.
Many hosting providers offer free domain registration along with the hosting plan. Some will even go a step further and keep renewing the name for free as long as you remain a client. Switching a provider, the domain remains your ownership and you can choose to transfer and manage it elsewhere.
Joomla Installation and Setup
Joomla has a fairly basic set of server requirements.
For version 3.x, you need to have at least PHP 5.3.10 installed, though the CMS developers recommend using 7.3 or above. Joomla works with MySQL, SQL Server, and PostgreSQL, which all support Apache 2.4 or above, Nginx 1.8 or above, and Microsoft IIS 7.
Installing Joomla depends on what is included in your hosting plan. Many packages come equipped with a state-of-the-art control panel, which offers a one-click installer for popular apps like Joomla. If that’s the case, you simply need to choose the folder to install the CMS and determine the admin login credentials.
Even a manual installation isn’t that difficult. You first need to download the installation ZIP archive from Joomla’s official website and upload the extracted files into the destination folder. Afterward, you create a MySQL database and a user associated with it.
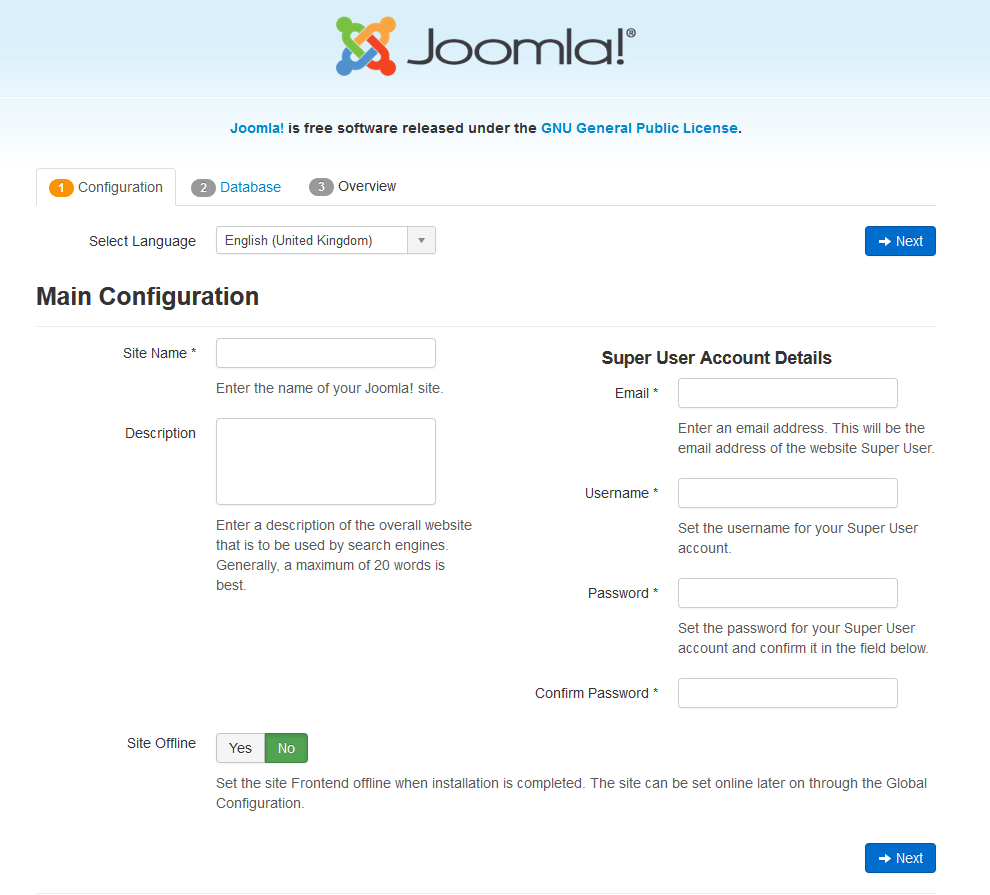
Loading the destination folder at this point, a setup wizard will appear and guide you through the Joomla installation. On the first page, you’ll enter your site’s name and description as well as the admin login details.
The next page will ask you for the correct database configuration. After you enter it, the wizard will give you a detailed overview of the installation you’re about to perform. If you approve it, the manual installation starts.
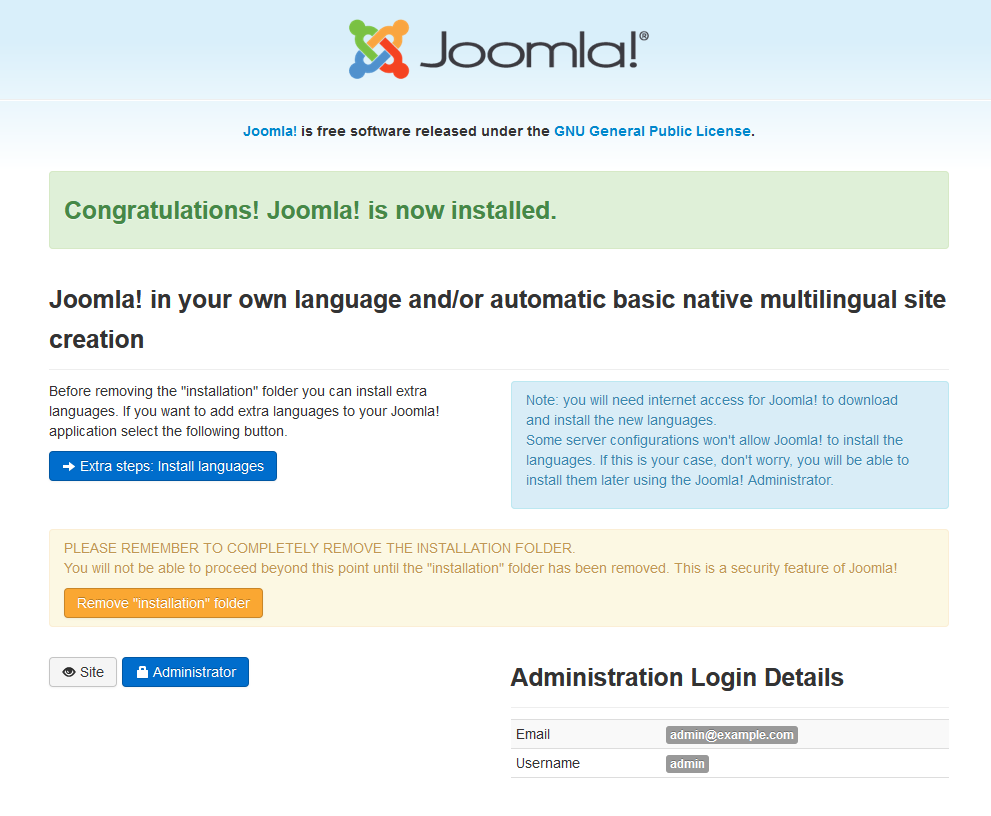
Once completed, you need to remove the installation folder to start working on your new Joomla website. The wizard can do it automatically for you.
Getting Familiar with the Joomla Basics
Like any other CMS, websites created with Joomla are controlled through a backend interface.
In Joomla’s case, it’s called a Control Panel, and you can find it on https://yourdomain.com/administrator by default. The first things you’ll see once logged are new message notifications, a log of the recent user actions, as well as left-side menus with shortcuts to essential areas in the backend.
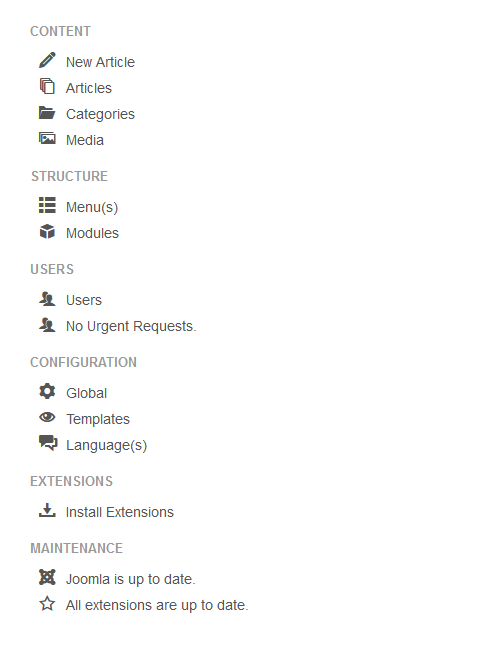
From here, you can write and publish articles, create menus, install modules, manage users, and many more. These tools, along with the rest of the utilities, are categorized and accessible from the ribbon at the top of the screen, as well.
Selecting your Template
Joomla templates are the equivalent of WordPress themes in many ways. They represent the front end of your website and determines how everything looks.
The Templates menu in Joomla is available from both the backend sidebar and under the Extensions category in the top ribbon. It has two submenus – Styles and Templates.

If you visit the Styles submenu, you will be able to apply a template to the entire website by clicking its button under the Default column. Joomla comes with only a couple of templates by default – Beez3 and Protostar, and if you click on their names under the Style column, you will be able to modify their color schemes and add extra images.
Installing your Template
The default Joomla themes are good for starters but far from sufficient for most business projects. Luckily, you can choose and install one of the thousands of free and paid alternatives available on third-party websites like ThemeForest and Template Monster.
To do this, you need to select the Extensions menu and go to Manage > Install.
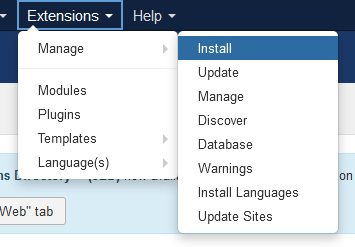
Choose the Upload Package File tab and drag-and-drop your template archive into the designated area. Alternatively, you can click the Browse for File button and select the ZIP file. After a few seconds, the installation should be completed and you will see the new template along with the default ones.
Customizing Templates
In the Templates submenu, you can also see the installed templates along with previews of how they look and a quick tour. If you click on a template name, you can access its files and modify them as per your needs.
You can alter the HTML and CSS files, upload new images, and even change the template structure. Bear in mind, however, these options are only suitable for advanced users as they require a bit of coding knowledge. Changes to your core theme files can break your entire website, so be sure to handle this with extra care.
Joomla Extensions
A great thing with Joomla is that devoted users and developers regularly create and update a wide range of extensions for the CMS. Unlike WordPress, however, Joomla uses the term “Extensions” to cover a much wider range of add-ons.
There are five distinct categories of Joomla extensions – Components, Modules, Plugins, Templates, and Languages.
Pretty much every component you use to customize your Joomla website can be considered an extension. Quite a few of those elements are built into the CMS by default, and there are more than 6,000 free and paid ones in Joomla’s Extensions Directory.
The directory can easily be found within the Joomla dashboard. Extensions from third-party sources are installed by opening the Extensions menu in the top ribbon and selecting Manage > Install. After you select the downloaded ZIP file, Joomla will automatically upload and install the necessary data.
Joomla Modules
Joomla modules extend the functionality of your website and improve user experience. They include search boxes, login forms, widgets, banners, and more.
The Modules menu is accessible from the Extensions section in your backend. All pre-enabled add-ons are visible here, along with their page position, type, and accessibility.
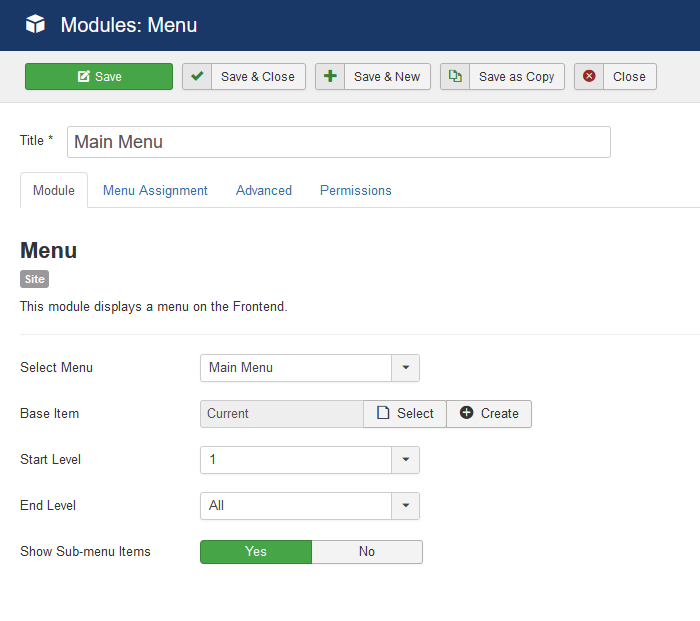
If you click on the name of a module – you can customize it further. This includes changing its position, size, and even the visual interface.
You can add more modules through the New button. There are quite a few different types to choose from or you can pick the Custom option to create an add-on yourself.
Positioning Joomla Modules
Joomla modules are extremely useful, but only when positioned correctly.
In the Modules menu, you will find a column that indicates the position of each widget. Some options are self-explanatory (i.e. header or footer) but others might appear very confusing (i.e. position 1)
To figure out the correct position, you need to enable Preview Module Positions.
Go to Extensions > Templates. Then, click the Options button and select Enabled next to Preview Module Positions. Now go back to your website and add “?tp=1” to the end of the URL (e.g., “http://yourdomain.com/?=tp1“).
Joomla will now display the individual module positions available, so you can figure out which is which.
Once done, you can disable Preview Module Positions.
Creating New Articles
The content you publish on your Joomla website is delivered in the form of articles. All saved articles are available from the left sidebar and under the Content menu on top.
To create a new post, simply click the New button.
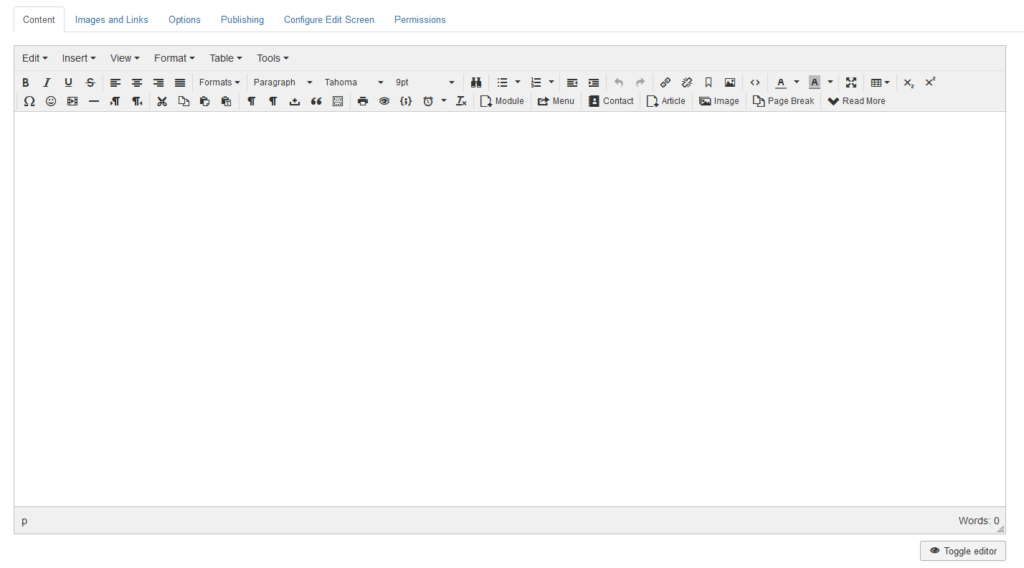
Finding your way around the Joomla isn’t such a hard task but still has some learning curve. If this is not your first time building a website, you will find many familiar menus and labels that other CMS solutions also support.
If you prefer to enter your HTML tags manually, Joomla offers you a Toggle Editor option to allow this manual modification.
Using the sidebar on the right, you can change the article status and category. The tabs above the editor allow you to add media files and configure your publishing options.
Adding Articles to Navigation Menus
Hosting a blog or portfolio website, you can expect to post new content (articles) regularly. Still, pages like About Us and Contact Us are often visible site-wide. To ensure that, you need to make them a part of the website’s navigation menu.
How to do that?
Simply go to Menus and click on the section you’d like to edit. All items in the selected menu will be displayed here.
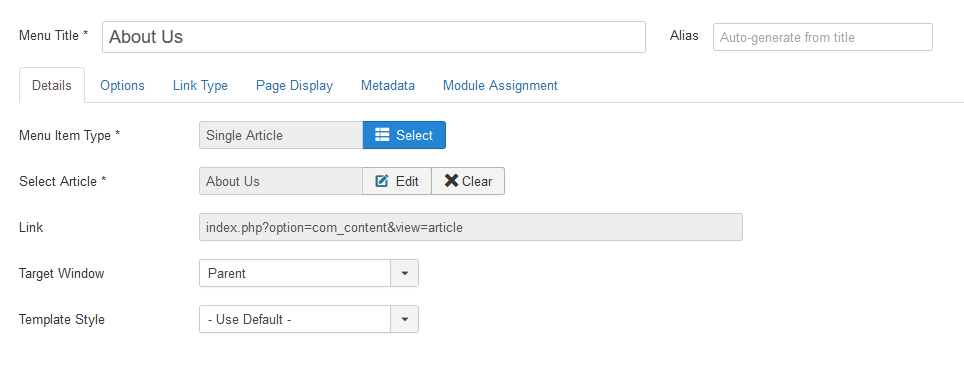
To add a new one, click on New and enter the new menu item title. From the Menu Item Type, you have to select Articles > Single Article. Then, click the Select button below and pick the article you want to add to this menu. You can also create a new article on the spot.
Conclusion
Even though it’s far less popular than WordPress, Joomla has its advantages. A lot of the needed functionality is built-in, meaning you won’t need to rely much on third-party code. Multilingual support is also available out of the box.
Some experts go as far as claiming that Joomla is even more SEO-friendly than WordPress.
Still, handling any CMS properly is impossible without the help of a reliable host and ScalaHosting is happy to offer some of the most affordable Joomla plans on the market.
FAQ
What is Joomla?
Unlike WordPress, Joomla didn’t start off as a simple blogging platform. Its goal has always been to give users the chance to create complex, good-looking websites quickly and easily. It might not be as easy-to-use as some of its competitors, but it’s efficient enough and still holds a very loyal user base.
Is Joomla free?
Joomla is a completely free and open-source platform. You can download a copy from its official website at https://www.joomla.org/ and install it manually, or use an automatic installer if your hosting plan offers one.
Do I need to be a programmer to create a Joomla website?
The whole point of using a CMS is you can create and manage a website from a simple web interface. Joomla is an intuitive solution that allows you to create your very own website without writing a single line of code. It might not be the easiest to get the hang on but you can master it even without being a programmer.
What kinds of websites can I create with Joomla?
Joomla can power a wide range of projects. You can use it to create anything from a personal blog to a complex portal for large corporations. The extra features provided by additional extensions and plugins can further add to its versatility.
ScalaHosting – How to Build a Website Using Joomla?


