Node.js is an open-source platform that helps JavaScript users execute their code outside a web browser. It is a free solution that runs well on almost any operating system. In terms of hosting, VPS servers provide a perfect environment to integrate Node.js apps with developer tools and APIs.
Let’s see what you need to do to use Node.js on both managed and self-managed VPS servers.
Table of contents:
- What is Node.js
- Why Node.js
- What is Node.js Used For?
- Node.js System Requirements
- Installing Node.js and npm
- Starting Node.js Apps
- How to Stop an Application
- Connect your Web Server with a Running Node.js App
- Deploying a Node.js Application with SPanel
- Conclusion
- Frequently Asked Questions
What is Node.js?
Node.js is a cross-platform, event-driven JavaScript runtime environment. It is built on Chrome’s V8 JavaScript engine alongside other development frameworks like MongoDB, Express.js, and AngularJS. Node.js lets you use JavaScript to create web servers, networking tools, and modules responsible for a number of core functions.
Because Node.js works with JavaScript only, it’s more accessible to a broad community of developers. At the same time, the APIs its modules use simplify the process of writing server applications.
Although you can run your NodeJS apps without it, experts recommend installing npm – Node.js’s official package manager. It consists of a client and an online database (the npm registry) of over 1 million free and paid-for packages. Thanks to npm, developers from all over the world can tap into an enormous pool of ready-made resources that help them speed up the development process.

Why Node.js?
Node.js brings many advantages to the table. For one, it’s already a lightning-fast scripting environment, and since it is built on Google’s engine, its performance is likely to improve over time. The npm registry is also expanding, so developers will probably have an even easier time finding what they’re looking for in the future.
Speed is far from the only thing Node.js is famous for, though. Read about it on the internet, and you’ll see that most people talk extensively about its asynchronous, event-driven architecture.
Let’s take a closer look at it and see how developers can benefit from it.
To understand how it works, we need to compare it to one of the alternatives. PHP is used by almost 80% of the world’s websites, so we’ll use it as an example. If a PHP application is asked to open a file, it won’t handle any other requests before it opens the said file. All subsequent requests depend on the execution of the first one.
By contrast, Node.js’s architecture is asynchronous, meaning multiple requests can be processed simultaneously. One request doesn’t need to wait for the execution of another, and the content delivery is much more efficient. As a result, the applications created with Node.js are fast, robust, and easily scalable.
In light of all this, it’s little wonder that tech giants like IBM, LinkedIn, Netflix, and PayPal have used Node.js during the development of some of their products.
What is Node.js Used For?
Node.js has been around since 2009, which isn’t that long compared to other web technologies. Nevertheless, it has already proven its worth as a robust development framework with dozens of uses in a number of different spheres.
Here’s where it shines the most:
Chat applications
The ability to efficiently deliver dynamic content, coupled with the existence of JavaScript libraries for real-time web applications, make Node.js perfect for developing excellent instant messaging services.
Browser games
HTML5 and the evolution of other technologies mean that you can now create great browser-based games without relying on horrible Flash animations. Node.js is one of the best new alternatives.
Streaming applications
Once again, Node.js’s asynchronous I/O enables streaming services to provide real-time, high-quality video to hundreds of thousands of users at once.
Back end tools
JavaScript is mainly associated with front-end development, but the truth is, there are JS libraries that enable developers to create fast and reliable command-line apps with Node.js.
Node.js System Requirements
Node.js’s lightweight design is one of the things that has made it so popular with developers. You have to bear in mind that you’ll need reasonably powerful hardware if you want to use Node.js on Windows. However, when it comes to Linux, the resource usage is so low, you can run standard Node.js applications even on a Raspberry Pi.
There are Linux versions for ARM and 64-bit architectures, and on Windows, it runs on both 32- and 64-bit machines. macOS servers need 64-bit chips to run Node.js, and there’s also an official image for Docker containers.
All in all, Node.js can run on most modern setups.

Installing Node.js and npm
Because it’s available on so many different operating systems and setups, there’s no one-size-fits-all tutorial that will show you the exact steps for installing Node.js. Most web hosting VPS servers run on Linux, so we’ll focus on it. Even with it, however, the installation process varies from distribution to distribution. Here are the two most common scenarios.
Installing Node.js and npm from the Ubuntu Official Repository
Node.js is popular enough to make its way into the official software repositories of one of the world’s most popular Linux distributions – Ubuntu. If your VPS uses Ubuntu, installing Node.js involves a few simple steps. Let’s have a look at them.
1. Update Your VPS
Before installing Node.js, it is advisable to update the package index for your Ubuntu virtual server. You can do so with the following command:
sudo apt-get update
2. Install Node.js
Because Node.js is a part of Ubuntu’s official repository, you can install it with a single command:
sudo apt-get install nodejs
NOTE: If you take this approach, Ubuntu will install the latest available package from the repository. This installation method isn’t suitable if you need a specific version of Node.js.
3. Install npm
Once again, you can install npm’s latest version with a single command:
sudo apt-get install npm
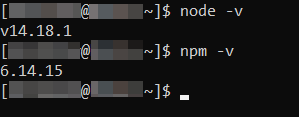
4. Verify that the installation is a success
The easiest way to ensure that the installation is successful is to ask Ubuntu which versions of Node.js and npm you’re currently using.
For Node.js, the command is:
node -v
and for npm, you need to enter:
npm -v
Installing Node.js Manually
If you don’t run Ubuntu or prefer to install a version of Node.js other than the latest one, you can perform the installation manually. It’s a bit more complicated than setting it up straight from the repository, but as long as you’re careful, you should have no problems doing it. Here are the steps:
1. Download and extract the Node.js archive
You first need to make sure you’re in your home directory. The command to go straight there is:
cd ~
Next, you can use the following command to download the Node.js archive:
wget https://nodejs.org/dist/v14.18.1/node-v14.18.1-linux-x64.tar.xz
NOTE: With this command, you will download version 14.18.1 (the latest at the time of writing). If you want to download a different version of Node.js, you’ll need to adjust the URL accordingly.
2. Extract the archive
To extract the Node.js archive you’ve just downloaded, use the following command:
tar xvf node-v14.18.1-linux-x64.tar.xz
The files will be extracted in a new directory called node-v14.18.1-linux-x64.
3. Rename Node.js’s directory to make your life easier
While not strictly necessary, this step will simplify the installation process. What we’ll do is rename the folder with the extracted files from node-v14.18.1-linux-x64 into something less cumbersome like node, for example. Here’s the command:
mv node-v14.18.1-linux-x64 node
4. Install Node.js’s and npm’s binaries
The final three commands will create the required directory, copy the binaries in it, and create the necessary symbolic links:
mkdir ~/bin
cp node/bin/node ~bin
cd~ bin
ln -s ../node/lib/node_modules/npm/bin/npm-cli.js npm
5. Check whether the installation is successful
Once again, you can ask Linux which versions of Node.js and npm are installed on the server to confirm that everything is fine. The commands are:
node -v
and
npm -v
In our case, the responses should be v14.18.1 and 6.14.15, respectively.
Starting Node.js Apps
Having installed Node.js and npm on your server, you’re probably wondering how to start an application with them. How you’re going to go about it depends on the app itself.
Using npm
If you need to start a production-ready app with a valid package.json file, you can use the npm package manager. The command is:
nohup npm start –production &
Using Node
If your app doesn’t have a package.json file, you’ll need to use Node.js itself. You can do it with the following command.
nohup node [your app’s name].js &
Note that if you choose to run an app that does not have an included package.json file, you won’t be able to manage it with npm.
How to Stop an Application
To terminate a running application, we need to kill the process. Luckily, there is an easy command to stop any Node.js processes on the server:
pkill node
Connect your Web Server with a Running Node.js App
Because of the various combinations of technologies а VPS can handle, there are many ways to connect your website to a Node.js app. Since Apache is one of the most common web servers, we will use this as the showcase platform.
We want to utilize the .htaccess file to perform the connection between the website and the Node.js app.
The .htaccess file is located in the document root folder (home/[your username]/public_html/). If you have a web hosting control panel installed on your server, you can get to it via the integrated file manager. Otherwise, your option is to access the server through SSH and open it with a text editor.
Here’s what you need to add to your .htaccess file:
DirectoryIndex disabled
RewriteEngine On
RewriteRule ^$ http://127.0.0.1:XXX/ [P,L]
RewriteCond %{REQUEST_FILENAME} !-f
RewriteRule ^(.*)$ http://127.0.0.1:XXX/$1 [P,L]
Replace “XXX” with the port number of your Node.js application. Once done, remember to save the changes to your .htaccess file before exiting the editor.
Deploying a Node.js Application with SPanel
Those of you finding all these steps a bit intimidating will be happy to learn that if you have an SPanel VPS, you don’t need to go through any of them.
Node.js integration used to be one of the most heavily requested features by our SPanel clients, and we had no other choice but to implement it. SPanel servers have always supported Node.js, but right now, you don’t need to install it yourself or ask someone else to do it.
Node.js is set up and configured on all SPanel servers, and inside our proprietary management platform, you’ll find an easy-to-use tool that helps you launch applications in a matter of clicks. Here are all the steps:
1. Upload your application to a folder of your choice.
You can use your favorite FTP client or SPanel’s File Manager to upload the Node.js app from your local computer to the virtual server.
2. Deploy the application through SPanel’s NodeJS Manager.
SPanel’s NodeJS manager is available in the User Interface.
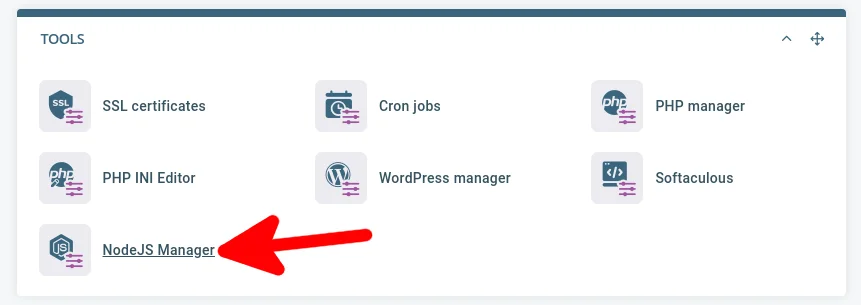
The Deploy a New App button opens a popup that lets you quickly launch your application. All you need to do is set the application URL, the port it will listen to, and the path to the app itself.
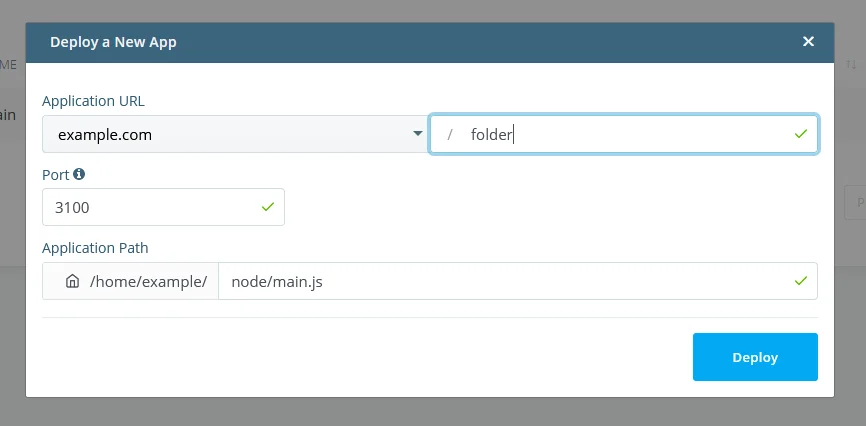
NOTE: You can only use ports between 3000 and 3500 for your Node.js applications.
Click Deploy to complete the process.
3. Manage your Node.js applications.
SPanel’s NodeJS Manager displays a list of all currently deployed Node.js applications. The Actions drop-down menus let you Stop, Restart, and Undeploy them one by one.
Conclusion
If you want to start a simple blog or a small online store, you probably don’t need Node.js. The JavaScript runtime environment is more suitable for more complex projects, usually led by people with more experience in the field.
With the correct commands, they should have no problems installing and using Node.js on a self-managed virtual server. However, even the biggest command-line wizards will appreciate the convenience of launching applications from an easy-to-use graphical user interface like SPanel’s NodeJS Manager.
Frequently Asked Questions
Must I pay to use Node.js?
Node.js is open-source and is free for use. Having said this, if you develop your Node.js project within a proprietary integrated development environment (IDE), there will likely be a fee involved as it is a commercial product.
What is NPM?
NPM is short for Node Package Manager. It serves as a repository for JavaScript packages that developers incorporate into their projects. It also gives web devs the capability to manage a specific version of each package.
Can I use Node.js with shared hosting?
In some circumstances, it may be possible to use Node.js with shared hosting. This will largely be dependent on the hosting provider. Still, VPS hosting is a much better choice if you’re looking to maximize your performance and security.
What database can be used with Node.js?
You can use any type of database with Node.js without any issues. Just make sure the database package is equipped with the necessary drivers to allow Node.js to interact with it. One good example would be MongoDB as it is designed to work well with data in JSON format specifically.


