Like many of the technologies we take for granted these days, MySQL was originally a small project run by a team of software engineers who wanted to create a database system for personal use.
However, over the years, its popularity has grown immensely, and we can now safely say that the internet would be a very different place without it.
The most popular content management systems, including WordPress, Joomla, Drupal, Magento, etc., use MySQL, and so do some of the planet’s top websites like Facebook, Twitter, Wikipedia, and YouTube. In other words, whatever website you’re building, you, too, probably need a MySQL database.
Today, we’ll show you how to create one.
How MySQL Works
MySQL is a relational database management system. A MySQL database stores information in tables, and users and web applications use the Structured Query Language (SQL) to retrieve the correct data from the correct table.
The database is an integral part of the operation of every dynamic website. It stores everything from your blog posts and articles to users’ personal information, passwords, purchases, etc.
For security reasons, MySQL databases aren’t freely accessible. In addition to the database, you also need a MySQL user account with privileges to read and modify the stored information. To minimize the risk of unauthorized access, every MySQL account has its own set of login credentials.
The web application that powers your website uses these credentials to retrieve information and display it on users’ screens.
Creating a MySQL Database via the Command Line
Traditionally, MySQL databases and user accounts are set up via the command-line interface (CLI). Today, we’ll show you not one, but two ways to do it.
In both cases, you first need to connect to your hosting account via SSH. You can use a dedicated client like PuTTY or your operating system’s built-in command-line tool. If you have an SPanel server, you can go straight to the SSH Terminal available in the User Interface.
The first method requires logging in to the MySQL server and executing SQL commands.
To create a new user and database, you’ll need an account with sufficient privileges. The command below shows you how to log in with the root account, but you can use any account with SYSTEM_USER privileges:
mysql -u root -p
After you provide the root account’s password, MySQL will sign you in and display the mysql> prompt.
From here on, you’ll use SQL commands. The syntax is not too complicated, but there are a couple of things you need to remember.
For readability purposes, SQL statements are usually written in uppercase letters, though they can also work if you don’t stick to this rule. What you do need to remember, however, is that every SQL command ends with a semicolon. If you forget it and press Enter, MySQL will interpret this as a new line.
Your first task is to create a MySQL user account. The command is:
CREATE USER ‘[the user’s username]’@’localhost’ IDENTIFIED BY ‘[the user’s password]’;

Don’t forget to use a strong password. The user account will have read/write permissions over the new database, so you must ensure it’s well protected.
Next, it’s time to set up the database itself. Here’s what you need to enter:
CREATE DATABASE [the new database’s name];
Finally, you have to give the user account permission to access the database and modify the information inside it. The command is:
GRANT ALL PRIVILEGES ON [the database’s name].* TO ‘[the user’s username]’@’localhost’;

The “.*” after the database’s name means that the user can modify all the tables in the database. If you want to give the user access to a specific table, you can add the name of the table after the dot.
With that, your database and MySQL user are ready to go. All you need to do is to configure your website to work with them. Another option to set up a database via the command line interface is through the mysqladmin binary.
Mysqladmin is a powerful database administration tool that gives you a quick and easy way to perform quite a few MySQL-related tasks, including:
- Monitoring MySQL server processes
- Flushing information logs, status variables, and tables
- Reloading MySQL privileges
- Setting and changing the root password
- Killing running queries
- Importing/exporting data files
As long as you have an account with SYSTEM_USER privileges, you can use mysqladmin to create a database without logging in to the MySQL server or executing any SQL queries.
After you connect to your hosting account via SSH, the syntax you’ll use is as follows:
$ mysqladmin -u [username] -p create [the name of the database]
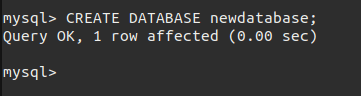
So, if you use the root account to create a database called “newdatabase,” the command will look like this:

Note that this is not an SQL query so you don’t need a semicolon at the end.
Once you provide your MySQL account’s password, mysqladmin will create the database for you.
Creating a Database Using phpMyAdmin
If you’re not a fan of the command-line interface, you can set up a new MySQL database with phpMyAdmin – one of the most popular browser-based database administration platforms. It has an intuitive graphical user interface that is easy to get used to. At the same time, it provides you with more than enough tools to cover all your needs.
Its default login URL is https://[your server’s IP]/phpmyadmin, though you need to check with your host to see if they have changed it. Often, it’s accessible via your control panel, as well.
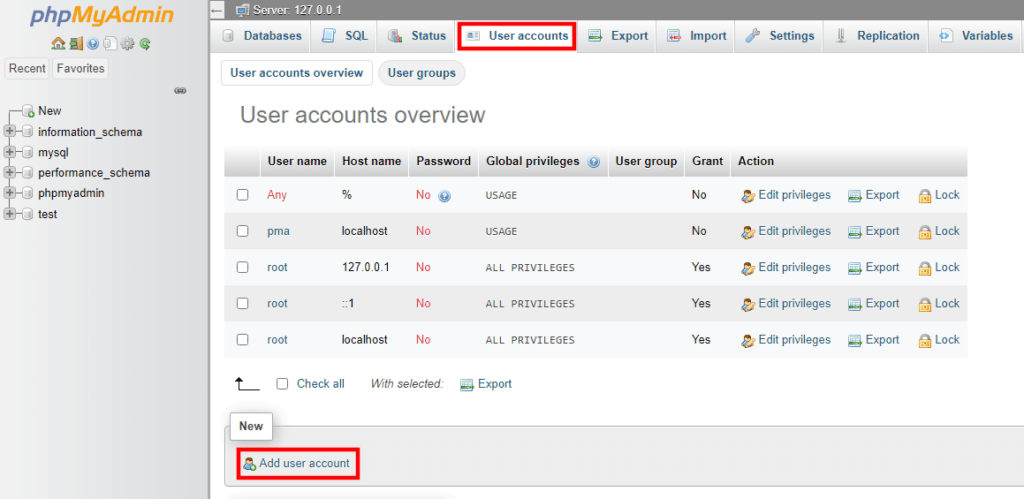
When it comes to creating a new database, phpMyAdmin gives you a few options. If you want to set up a new user account and database pair, you need to go to the User accounts tab and click Add user account.
On the next page, enter the new user’s details. You need to pick a username, a hostname (in most cases, you need to enter “localhost”), and a password.
In Database for user account section, select the Create database with same name and grant all privileges checkbox.
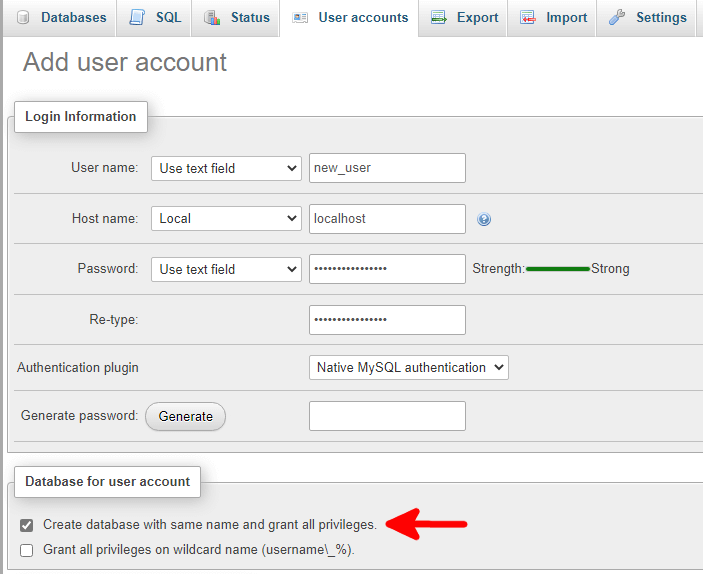
This checkbox saves you the time you would otherwise spend on setting up the database and the user account separately. Finally, scroll down to the bottom of the page and click Go. If you want to create a new database and give an existing user account access to it, the procedure is different.
From phpMyAdmin’s homepage, you need to open the Databases tab. Above the list of existing databases, you have the form for creating a new one. Pick the database’s name and collation and click the Create button to set it up.
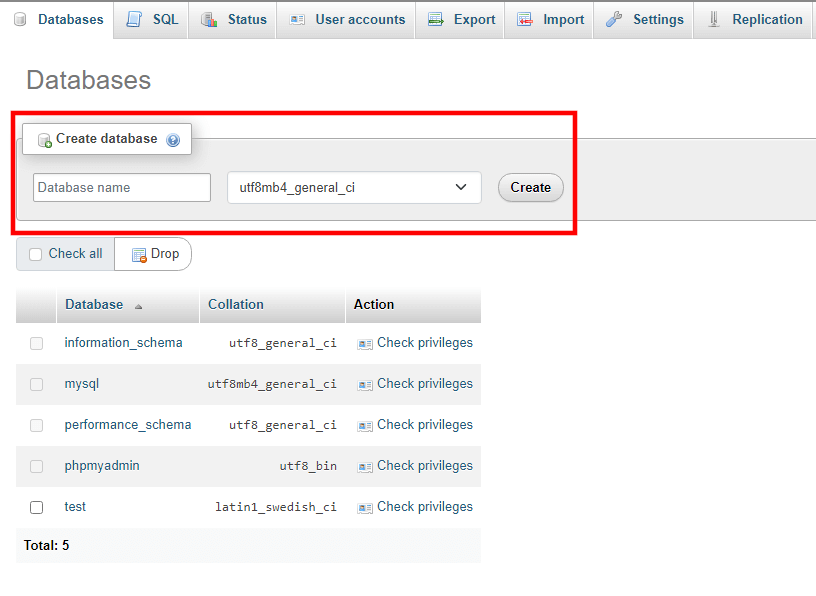
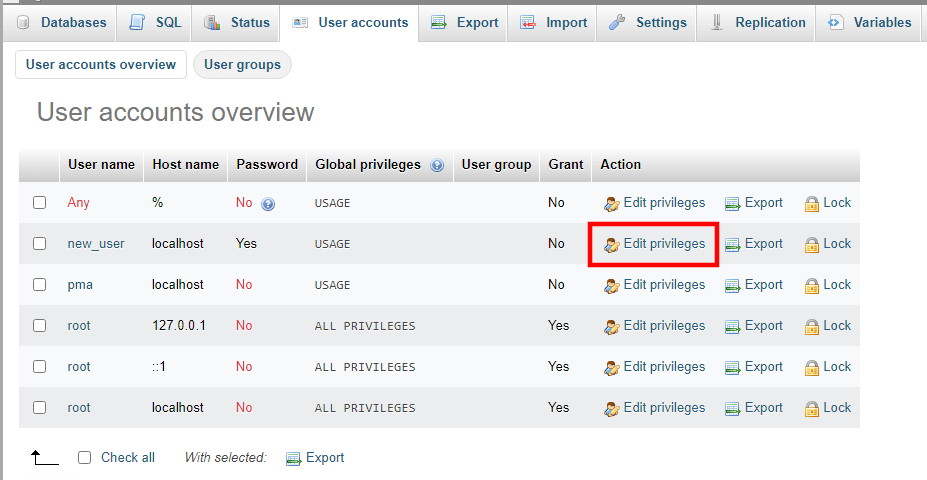
The database will be created, and phpMyAdmin will automatically open it, so you can start creating tables and filling it with data. To grant an existing MySQL user access to it, go back to phpMyAdmin’s homepage and open the User Accounts tab. Find the user you want to modify on the list and click Edit privileges.
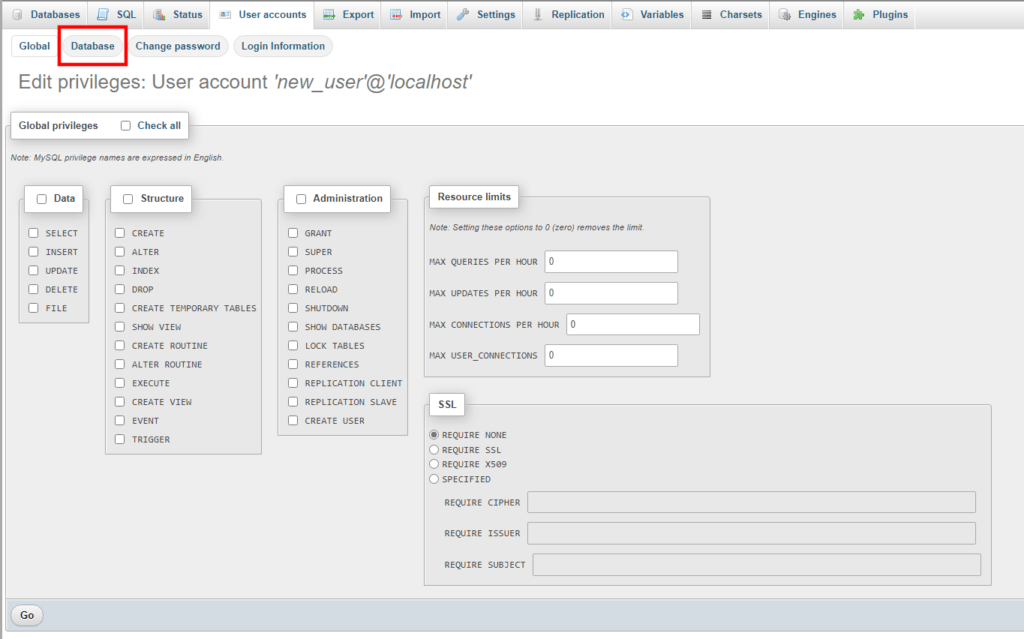
First, phpMyAdmin lets you access the user’s global privileges. The checkboxes you see at this point are useful if you want to give the user access to all your databases. However, if you want to restrict the account to a specific one, you need to click the Database button.
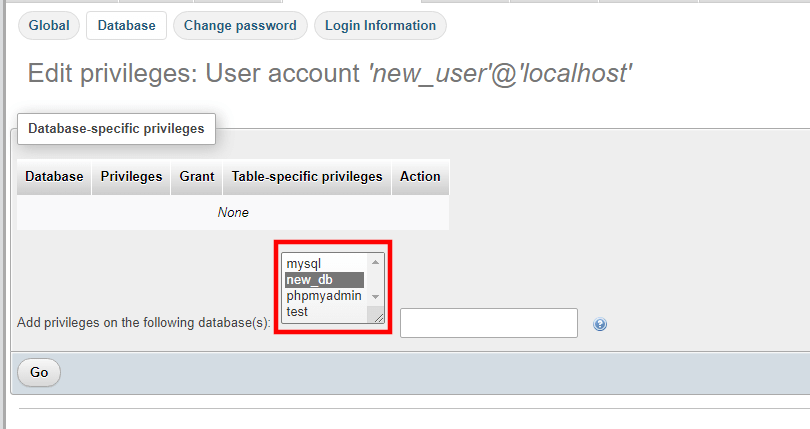
Select the new database from the list and click Go. If you hold down Ctrl or cmd, you can select multiple databases.
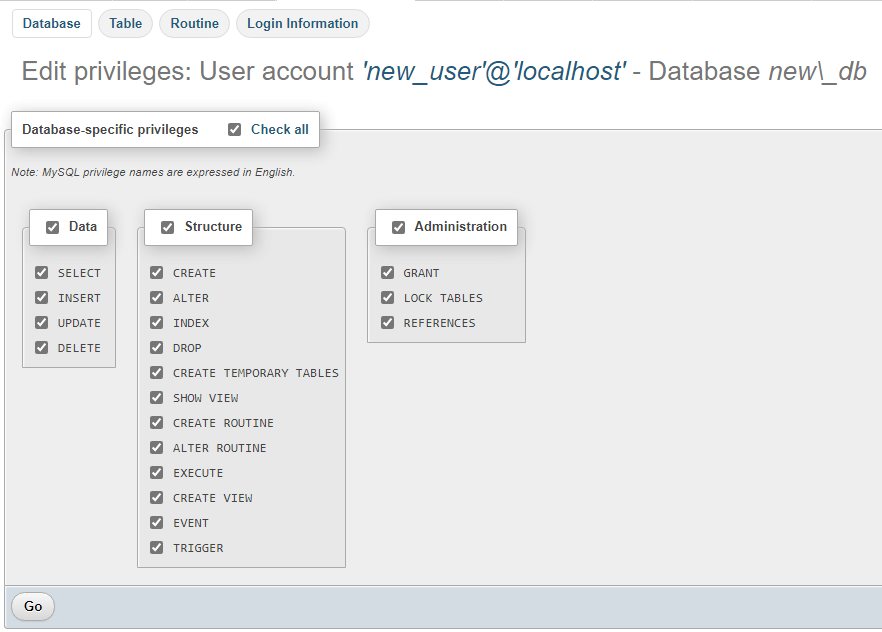
Click Go and set the account’s privileges. If you want the new user to have full access, click the Check all checkbox. Clicking the Go button completes the process.
With that, your database and MySQL user account are set up and configured.
Creating a MySQL Database With MySQL Workbench
MySQL Workbench is a free GUI-based tool for developing, maintaining, and administering MySQL databases. It’s available for Windows, Linux, and MacOS, and you can use it for both local development and remote administration.
Your first job is to connect to your hosting server via MySQL Workbench. Open the application and click the + button next to MySQL Connections.
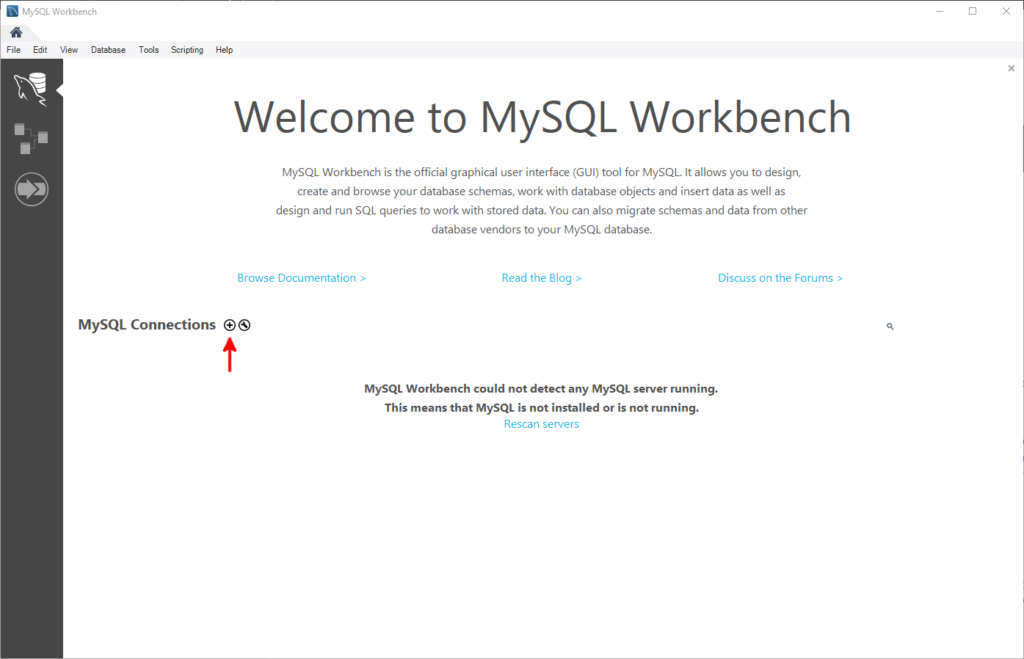
There are quite a few fields in the dialog that appears, but filling them all in shouldn’t be a problem.
In Connection Name, enter a name that will help you differentiate between the different MySQL servers and user accounts you’ll use with Workbench. Make sure you enter something that tells you immediately what the connection is (e.g., “Root account on production server“).
From the Connection Method drop-down, it’s best to pick Standard TCP/IP over SSH, as it encrypts your connection and protects your data.
Enter your hosting server’s IP in the SSH Hostname field. If it uses a custom SSH port (one that is different from port 22), the IP must be followed by a colon and the port number. For example, because ScalaHosting’s managed SPanel servers use port 6543 for SSH connections, the address should look like this: xxx.xxx.xxx.xxx:6543.
The SSH Username is for the username you use to establish an SSH connection (e.g., your cPanel/SPanel account’s username).
Next, you need to pick the authentication method for your SSH user. If you click Store in Vault, you can save your account’s password in MySQL Workbench. Alternatively, if you have enabled SSH key authentication on your account, you can configure it via the next field. Unless you have some sort of custom configuration, you don’t need to touch the values in the MySQL Hostname and MySQL Server Port fields.
Finally, it’s time to set the login credentials for your MySQL user account. Once again, MySQL Workbench can save your password in its vault, so you don’t have to enter it every time you establish a connection.
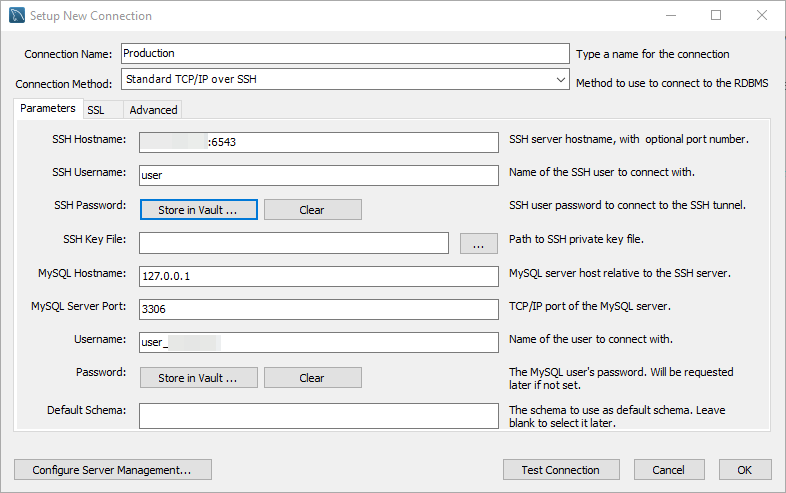
With the form filled in, you can click Test Connection to make sure everything works. If it does, the OK button saves the new connection, and it becomes visible on MySQL Workbench’s homepage.
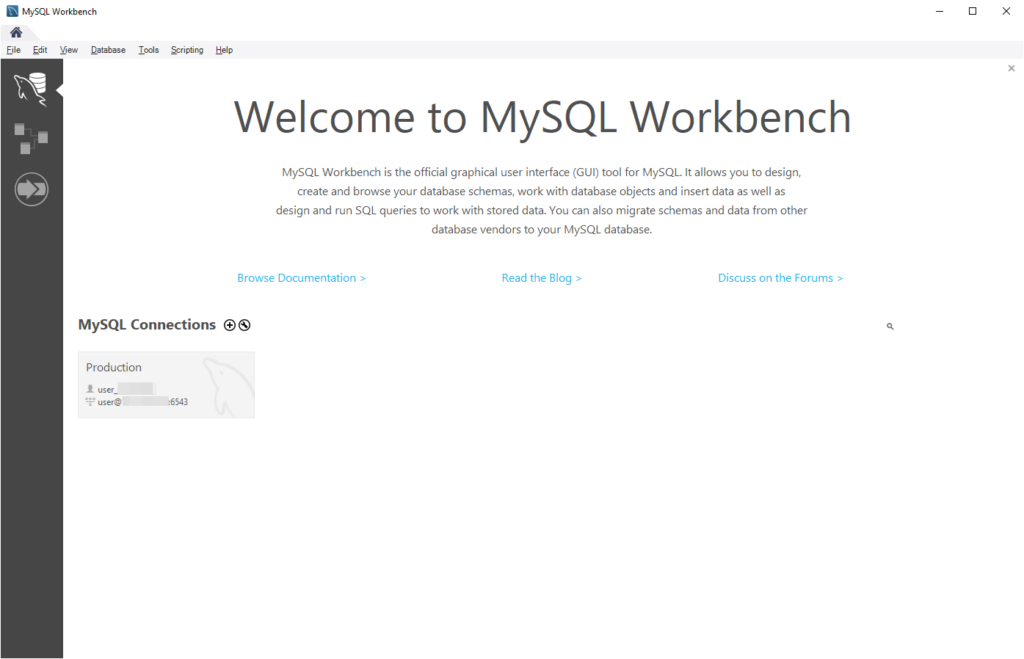
All you need to do to access your remote MySQL server now is to click on the connection.
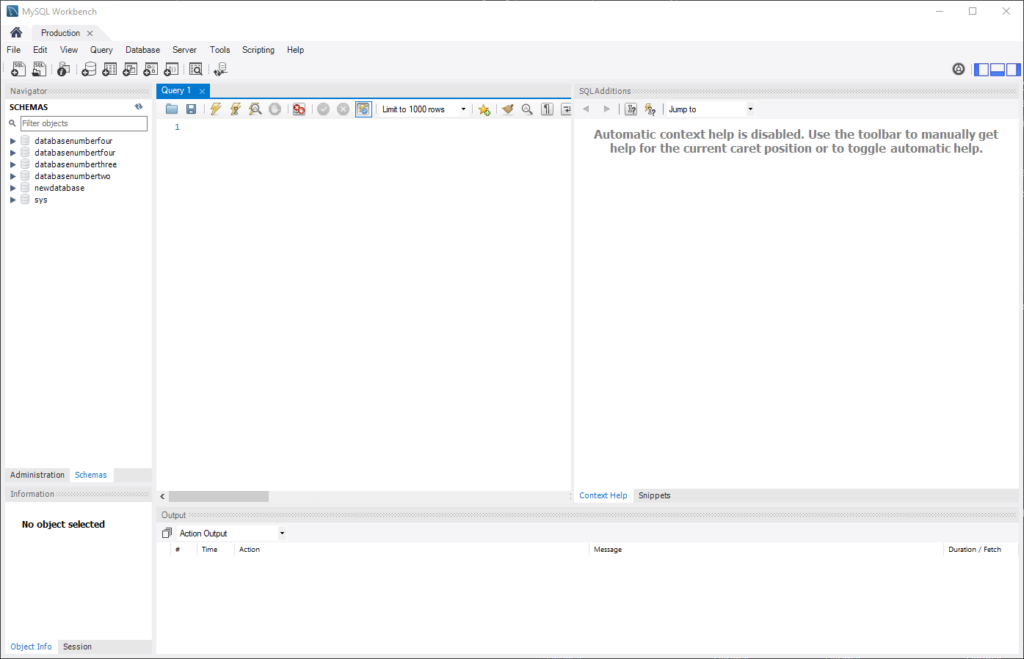
In the Navigator section, you’ll see all databases your MySQL user has access to, and on the main toolbar, you’ll find the Create a new schema in the connected server button. In MySQL “schema” and “database” are treated as synonyms, so this is the button you need to use to set up a new database.
Choose a unique name for the database and enter it into its respective field. For most purposes, the default values in the Charset and Collation drop-down menus should work.
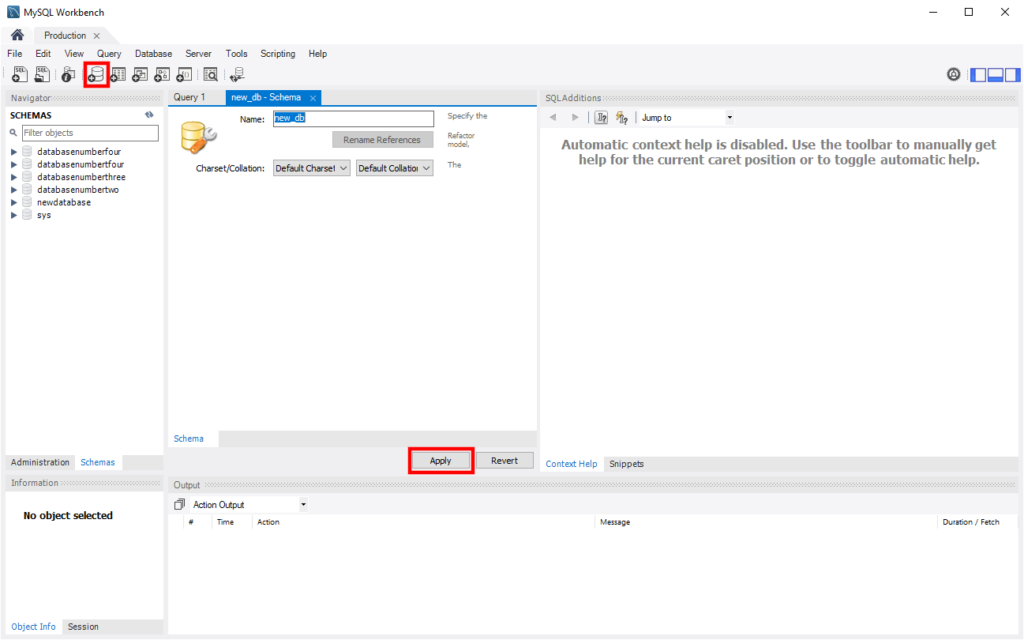
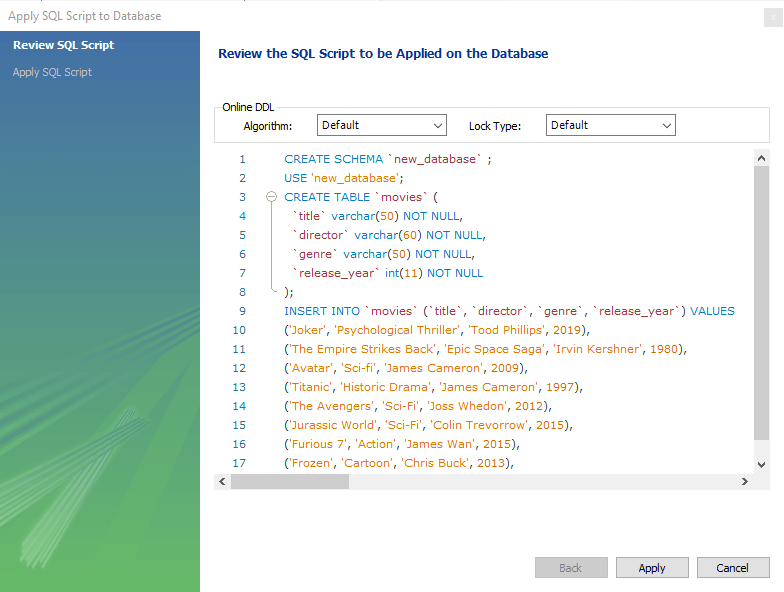
When you’re done, click Apply. A new dialog appears letting you add additional SQL scripting to your new database. As you can see from the screenshot below, you can create a database, set up a table, and fill it with data, all in one go.
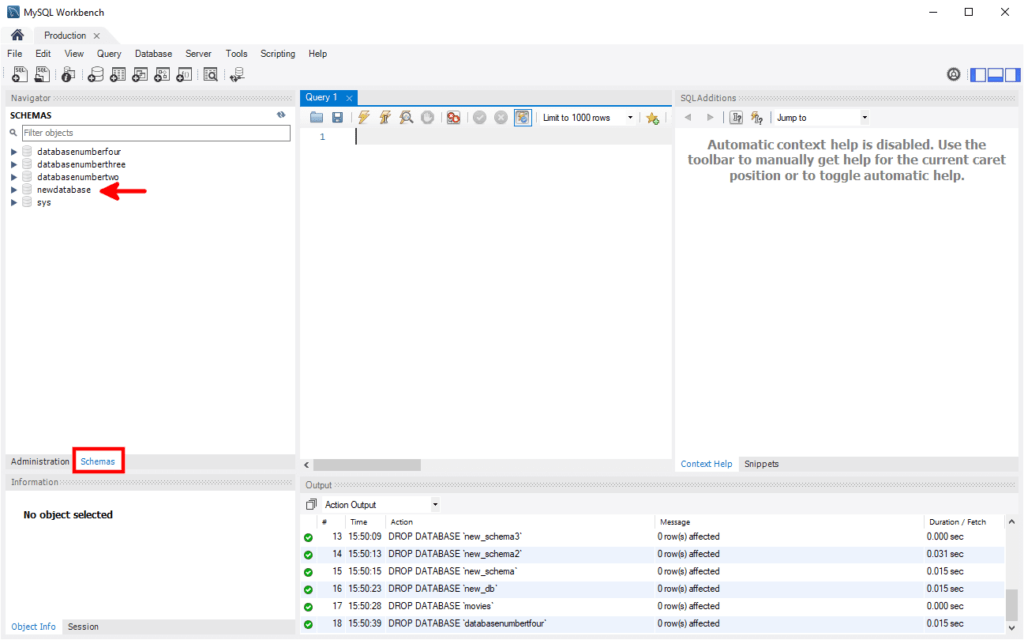
After you click Apply, the database will appear in the Schemas tab under the Navigator section.
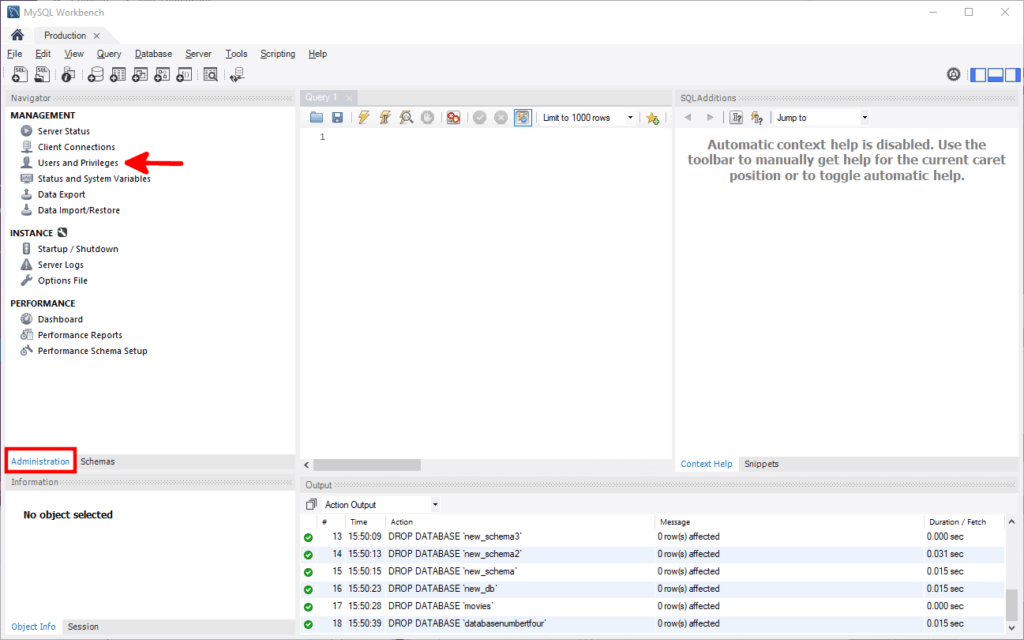
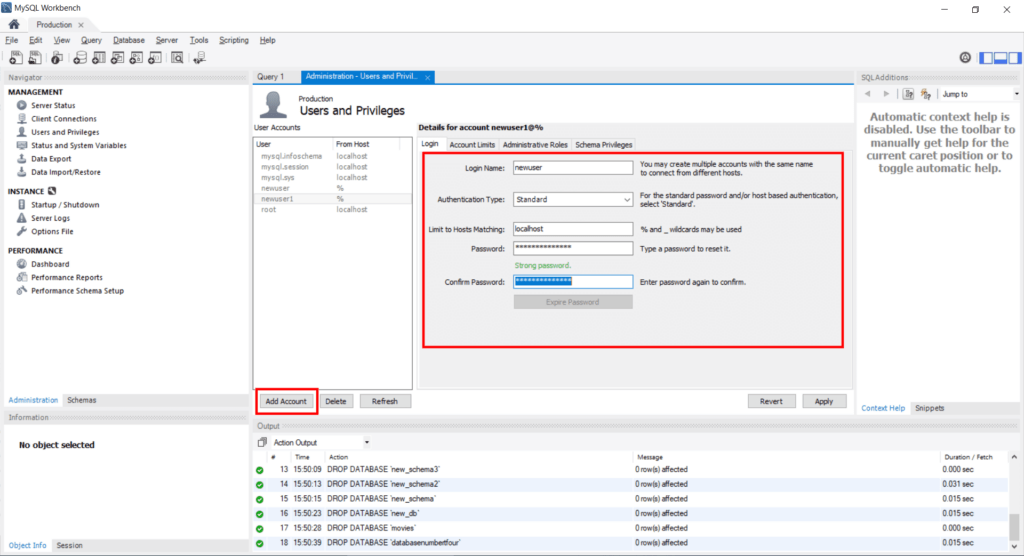
To create a user account and give it access to the new database, open the Administration tab and click Users and Privileges.
Click the Add Account button to set the new user’s username and login details.
Next, go to Schema Privileges, click Add Entry, and pick the option you need. You can grant the user account access to all databases, use it to edit schemas that match a specific pattern, or restrict the privileges to a single database.
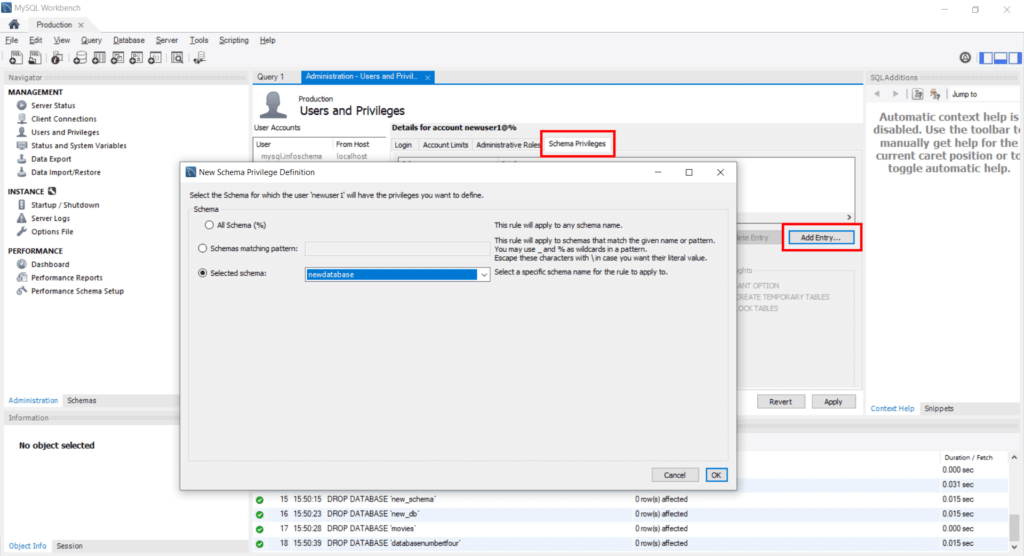
Click OK and select the entry you just added. You’ll see the menu with the privileges you can grant the user. If you want the account to have full access to the database, select all of them and click Apply.
Creating a MySQL Database in SPanel
With SPanel, creating a MySQL database and user account takes no more than a couple of mouse clicks.
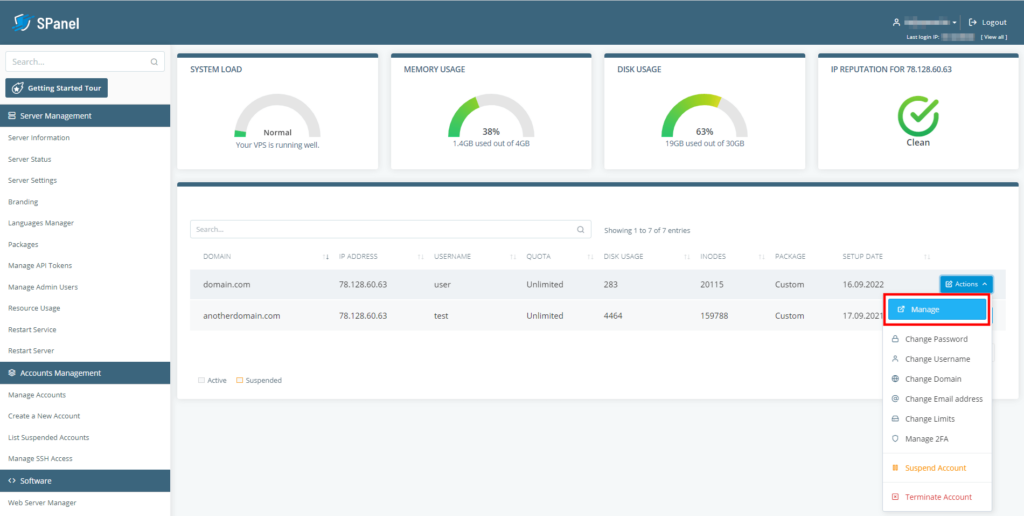
First, log in to SPanel’s User Interface. One way to do it is via the Admin Area. Find the account you want to modify on the homepage, open the Actions drop-down menu, and click the Manage button.
Alternatively, you can sign in with the user’s credentials at https://[the account’s domain]/spanel/.
Open the MySQL databases tool on the homepage of SPanel’s User Interface.

At the bottom of the page, you’ll find a list of existing databases and MySQL users created on the account.
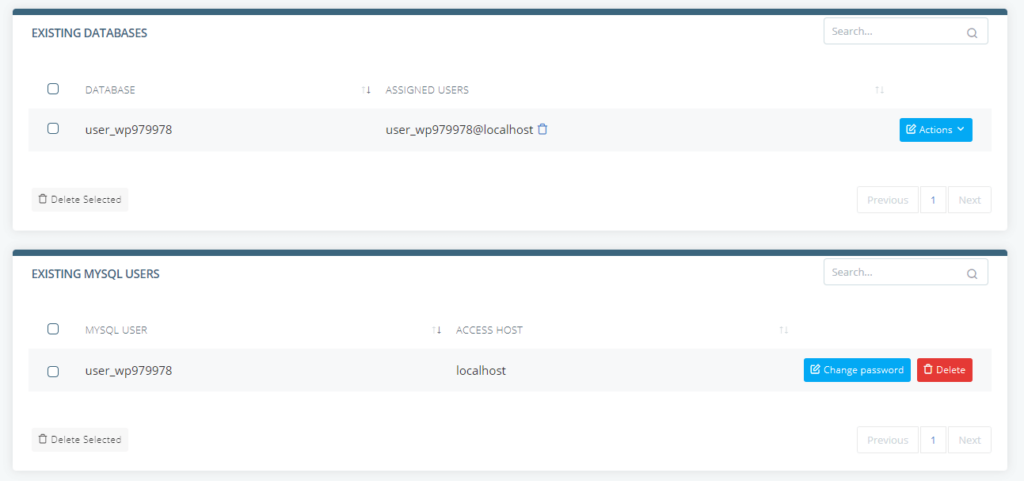
If this is a brand new account, these lists should be empty. Above them, there are the database and user setup forms.
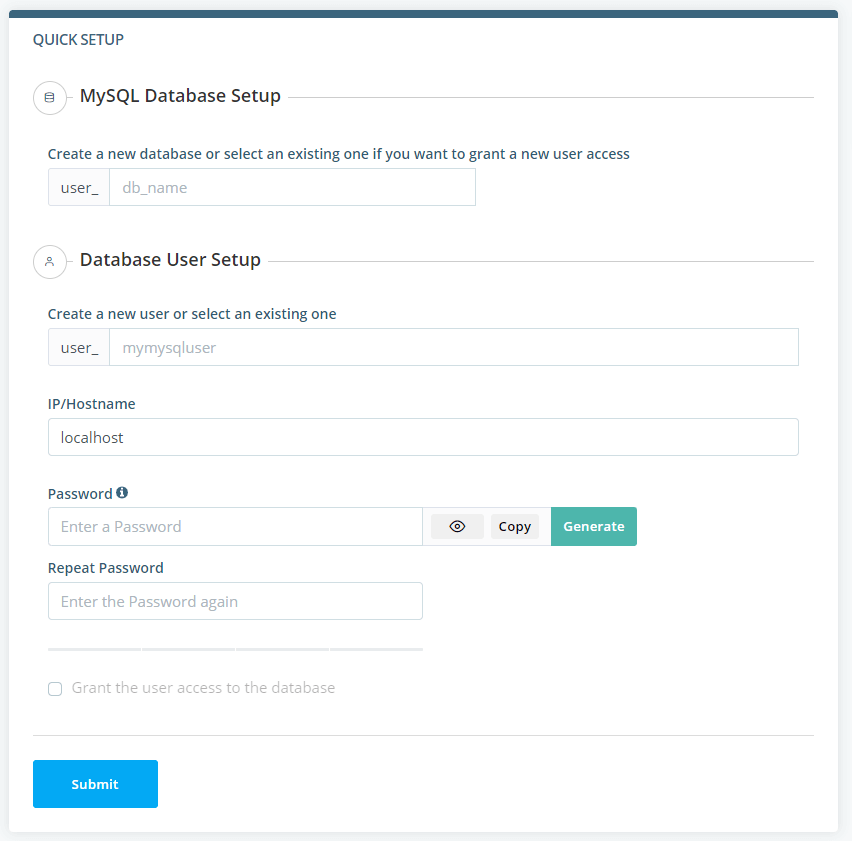
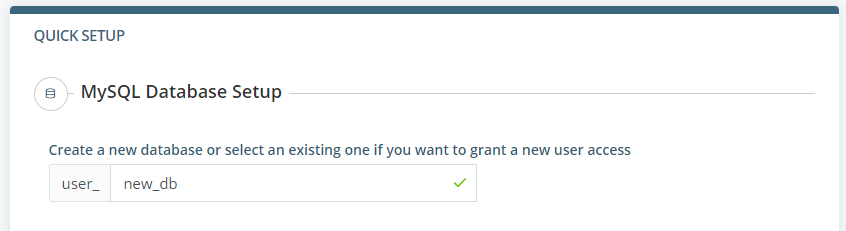
The only piece of information required for the creation of the database is its name. It can contain letters, numbers, and underscores, and you need to fill it into the db_name field.
At this point, if you click Submit, the database will be created, but there will be no MySQL users with access to it. To create a new user, you need to fill in the details in the Database User Setup section.
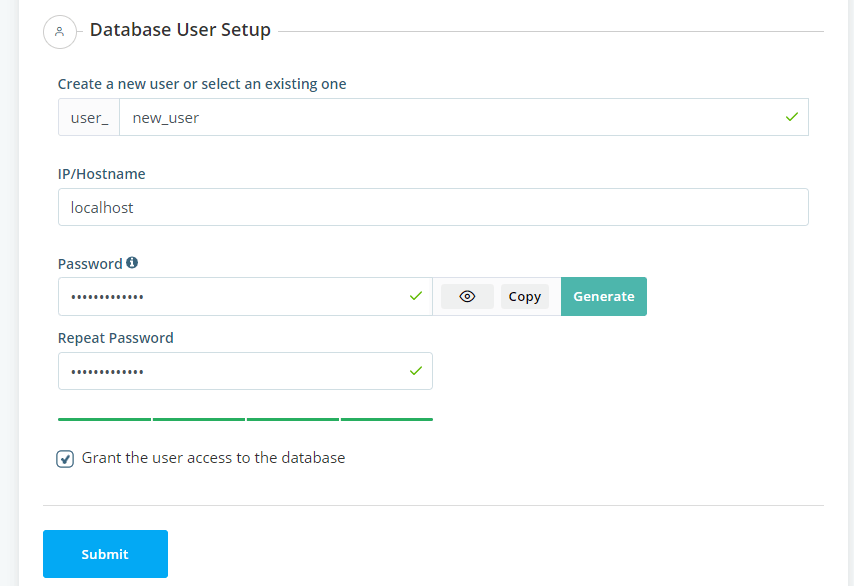
First, it’s the account’s username. You can pick any username that consists of letters, numbers, and underscores, though many prefer to use the database’s name. Unless you have a custom configuration, the IP/Hostname should be set to “localhost” – the default value.
Finally, you need to pick a password for the new MySQL user. Because it will protect your entire website, we’ve set a minimum password length of at least eight characters. For your convenience, we’ve also embedded a generator that creates a properly strong password, which you can copy and store for later use.
Last but not least, make sure the Grant the user access to the database checkbox is selected before clicking Submit. Otherwise, the new user won’t be able to read/write data in the database.
Clicking the Submit button sets up the database and the MySQL user account with the parameters you’ve just set.
