A Managed VPS gives you the maximum security, scalability and performance for your website and online business. You get your own fully managed cloud server with a control panel and daily backups with no restrictions and dedicated/guaranteed server resources such as:
- CPU power
- RAM
- SSD space
- Network speed
Everyone can run their website on a managed VPS, without needing technical skills or previous knowledge.
Table of contents: Getting Started with Managed VPS Hosting
- What is managed VPS hosting?
- Activation of your VPS
- Accessing SPanel – the ALL-IN-ONE cloud management platform
- The tools in your SPanel Managed VPS
- Set up your domain name
- Create a new website or transfer an existing one
- Set up your free SSL certificate
- Set up your email
- Get technical support
- Refer friends and get $50 per signup
What is Managed VPS Hosting?
A managed VPS is the most secure, reliable and scalable hosting solution you can get for your website. It gives you a dedicated hosting environment where all resources are guaranteed and consistently delivers maximum performance and high-speed. The efficiency and value of the managed cloud VPS are much higher than any other type of hosting.
The main advantages are:
- Ultra-high security
- Dedicated IP and resources
- Guaranteed high-speed and performance
- Faster than shared hosting
- No restrictions
Unlike the self-managed VPS, the managed VPS hosting service is really easy to use. You don’t need any technical skills nor experience to run your website on its own server.
Activation of Your Managed VPS
The activation of your managed VPS is instant and it happens immediately after receiving your payment. Once activated we send an email to notify you that we are working on the set-up of your server.
Minutes later you receive the welcome email for the VPS which contains all the information you need to get started.
A very tiny amount of the orders get flagged for a manual verification where action on your behalf is required before we can activate the service.
Accessing SPanel – The ALL-IN-ONE Cloud Management Platform
SPanel is an ALL-IN-ONE management platform for cloud virtual servers. It includes everything a website owner needs to run their website in a secure environment. It is a quick, easy and more powerful replacement of the cPanel control panel. Any website working on a cPanel server will also work on a SPanel cloud VPS.
SPanel has two interfaces to manage the accounts on the server.
The SPanel Admin Interface
The SPanel Admin interface allows the server owners to:
- Create new accounts
- Terminate existing accounts
- Set disk quotas
- Change the username of a given account
- Change the main domain of a given account
- Suspend/unsuspend individual accounts
- Monitor server health
- Restart individual services or the whole server
- Get information about CPU Load, RAM and Disk Space Usage
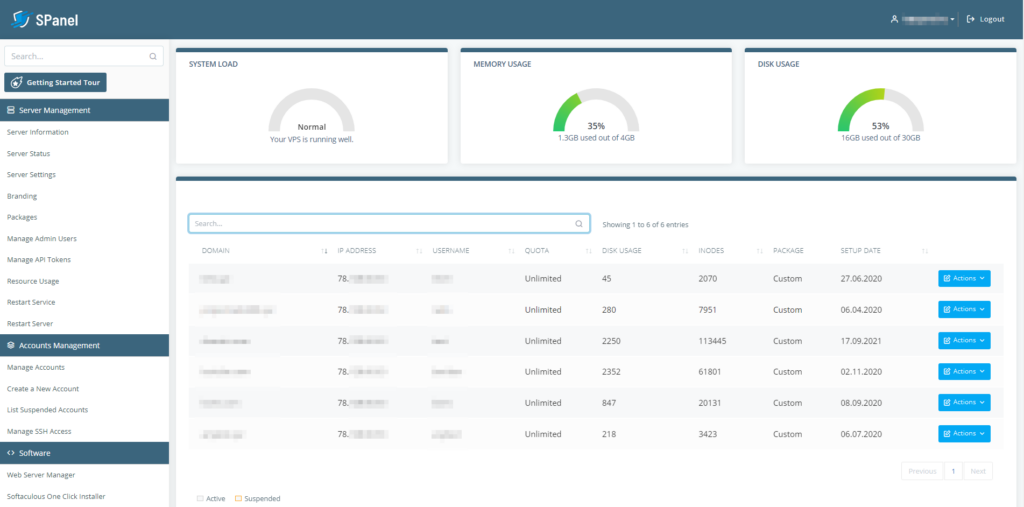
From the Admin Interface, the server owner can log into the User Interface of each individual account created on the server.
To do this:
- Log in to the Admin Interface
- Select the account that you want to log in to from the list on the homepage
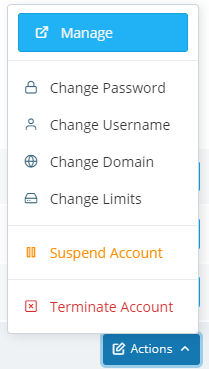
- Click Actions in the right corner, then click Manage from the drop-down
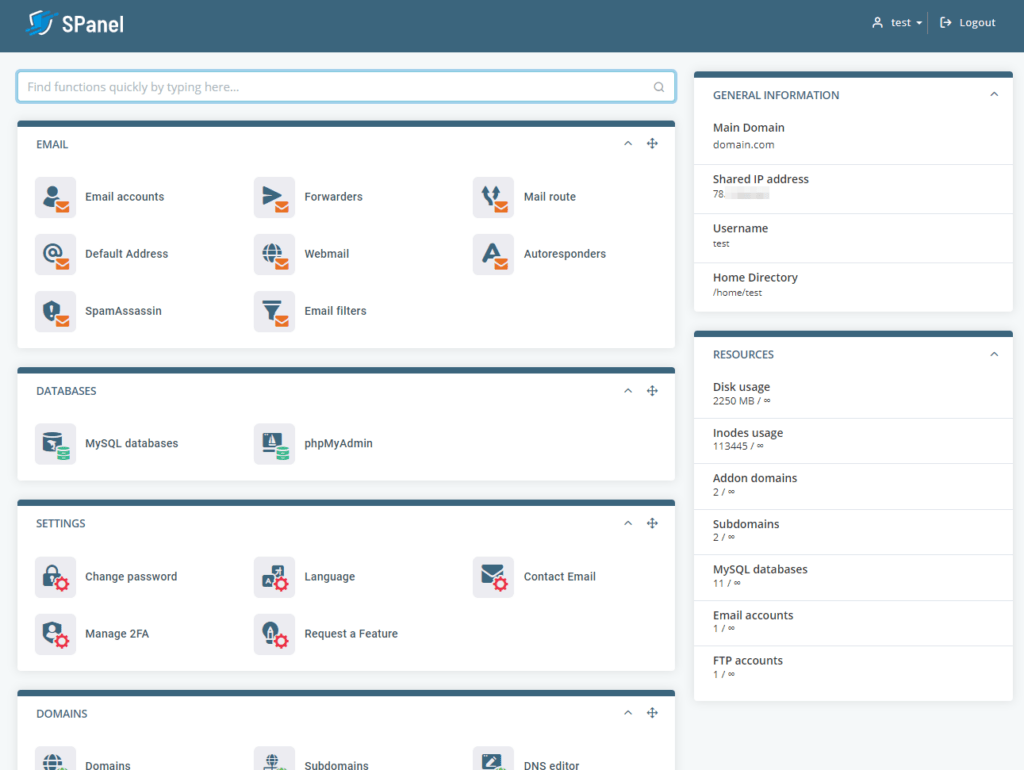
The SPanel User Interface
The SPanel User Interface is where each individual account is being managed.
The SPanel User interface allows server owners to:
- Create/remove Email boxes, forwarders and auto-responders
- Create/remove databases and database users
- Add/remove additional domains and subdomains
- Add/edit/remove DNS records
- Generate and restore backups
- Install SSL certificates
- Add/edit/remove cron jobs
- Change the PHP version of your site
- Access the SWordPress Manager and install a WordPress based website with a single click
How to Create an Account from the SPanel Admin Interface?
You can create unlimited user accounts from the SPanel Admin Interface.
- Login to your SPanel Admin Interface
- From the navigation bar on the left, select Create a New Account
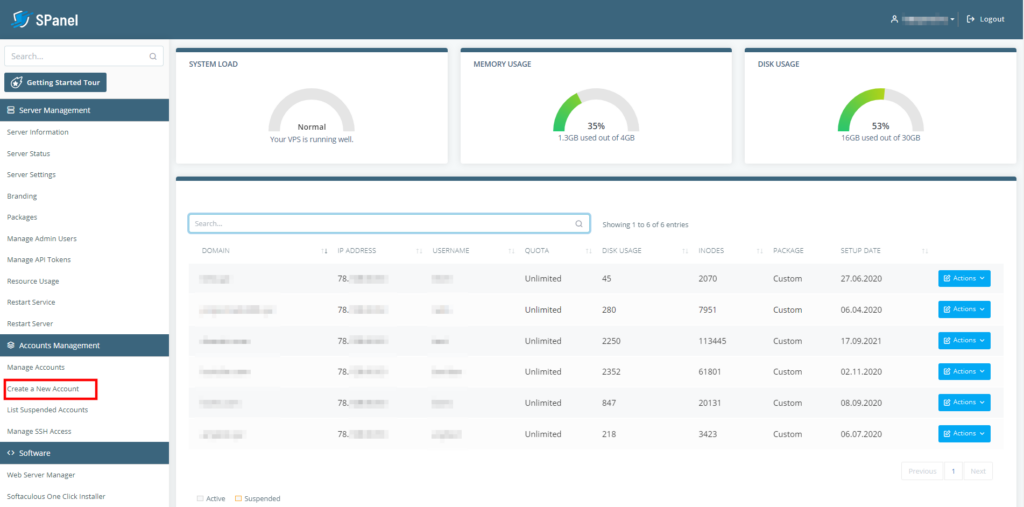
- Fill in the Create an Account form
- Click Create an Account
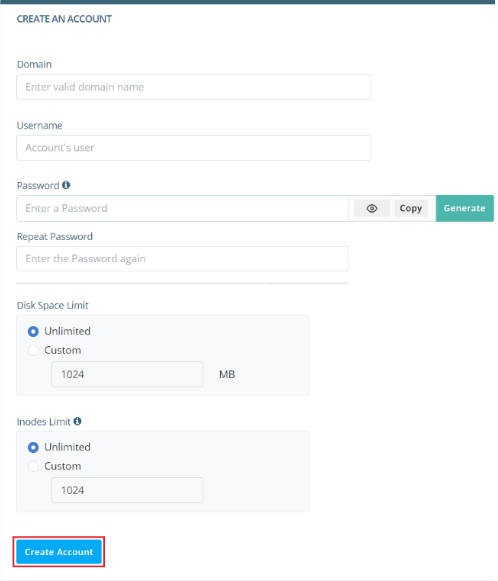
Note: The login URL for both the Admin and the User Interface is the same. SPanel will automatically load the correct interface depending on the login details you are using. If you log in with the admin login details, you’ll be redirected to the Admin Interface and when you log in with a user login – you’ll be redirected to the User Interface automatically.
The Tools in Your SPanel Managed VPS
SPanel comes with plenty of top-notch tools to make your websites more secure and easy-to-manage. It also has built-in integrations which bring you the most modern cloud VPS management technologies in serving and securing websites.
SWordPress Manager
Makes managing WordPress much easier, saves time and adds multi-layer security and control over WordPress websites.
The SWordPress manager allows you to:
- Install WordPress with a single click
- Manage automatic updates of the core, themes, and plugins
- Clone/stage WordPress installations
- Reset the admin password
- Introduces the unique for WordPress security feature Security LOCK, which makes WordPress immune to malware injections. Additionally, it prevents malicious files to be uploaded to your website. At the same time, your website loads just fine and operates normally. The security lock must be disabled if only you want to install a new WordPress plugin
SShield Real-time Cyber-security System
An innovative proprietary cyber-security system, which blocks 99.998% of the web attacks and monitors your websites on the VPS for hacks in real time.
If a website is compromised, SShield automatically notifies you via email and gives you a full report of the affected files and the steps you need to take in order to secure the website. SShield helps us significantly decrease the number of compromised websites, and make the web a better, safer place.
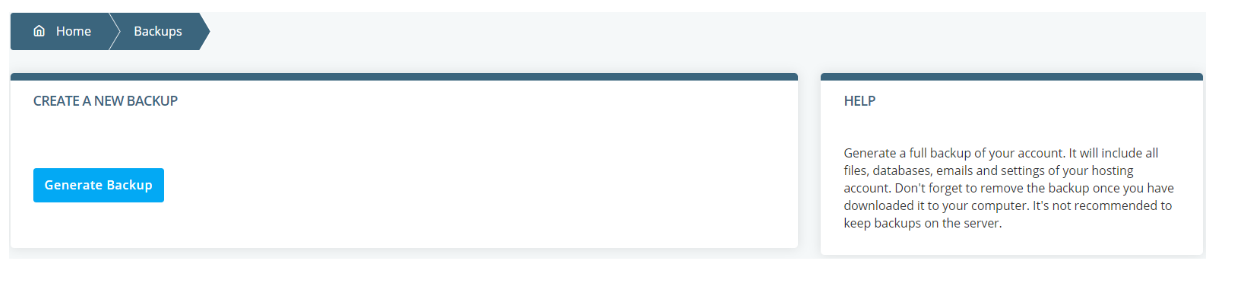
SBackup
SBackup is a backup system built-in to SPanel which takes daily backups of your server and stores them remotely. By default, it keeps only one backup of the VPS which is overwritten daily.
If you store important data on the server, we recommend keeping at least 3 backups for each of the last 3 days.
Keeping your own backup just in case is highly recommended.
Free SSL Certificates for All Your Websites
SPanel has a built-in integration with Let’s encrypt to automatically issue, install and renew a free SSL certificate for each website that you host on your SPanel VPS. If you host your websites on SPanel, you don’t need to pay for SSL certificates anymore.
LiteSpeed Enterprise Integration
SPanel doesn’t eat any of your server’s CPU/RAM resources hence you can take advantage of the fastest web server in the world for free. If you host one website on your SPanel VPS with 2GB RAM (with as much CPU power as you want), we can install the Enterprise version of LiteSpeed which is proven to be the fastest in the world.
On a SPanel VPS with 2GB RAM, LiteSpeed lets you have over 1,000,000 website visitors per month. It is a 100% drop-in replacement for the Apache web server, and any website that runs on Apache will also run on LiteSpeed Enterprise.
On top of that, you will be able to use the caching plugins of LiteSpeed for WordPress, Joomla, Drupal, Opencart and Prestashop without paying extra. Those are some of the best and most efficient plugins that exist today.
OpenLiteSpeed Integration
SPanel supports the open-source free version of LiteSpeed which is called OpenLiteSpeed. Unlike LiteSpeed Enterprise, OpenLiteSpeed does not have any limitations for the number of websites, or the RAM of the server.
The performance of LiteSpeed Enterprise and OpenLiteSpeed is almost the same. The difference here is that OpenLiteSpeed is not an Apache drop-in replacement, which means it only supports mod_rewrite. Other custom configurations would need to be re-done. The most used CMS systems such as WordPress run perfectly on OpenLiteSpeed and bring a significant performance increase. You can easily serve millions of website visitors with OpenLiteSpeed on a SPanel VPS for under $35 per month.
Nginx Integration
Nginx is a free web server which is 2 times faster than the Apache web server for serving static content such as: images, CSS, JavaScript, HTML. That’s why SPanel supports it natively and when enabled, it runs Nginx as an Apache proxy for processing the static content only. PHP scripts continue to be executed via Apache with PHP-FPM.
The Nginx integration allows customers to use the micro-caching feature which can cache both dynamic and static content in the RAM of your server making your websites blazing-fast.
Set up Your Domain Name
Once you create your first account in the SPanel Admin Interface, you will be given information about the nameservers that you have to set for the domain name at your domain registrar to point the domain to your SPanel VPS. The same nameservers are also included in your welcome email for the VPS.
Please note that once you change the nameservers, it will take up to 24 hours for DNS propagation, so that the changes take effect globally.
You must use the same nameservers for each domain name that you add to the server. There are no restrictions on how many accounts you can create on your VPS.
Create a New Website or Transfer an Existing
If you are creating a new website, you must first complete the steps above for creating an account for the website via the SPanel Admin Interface, set up your domain by setting the proper nameservers and the final step is to develop the website.
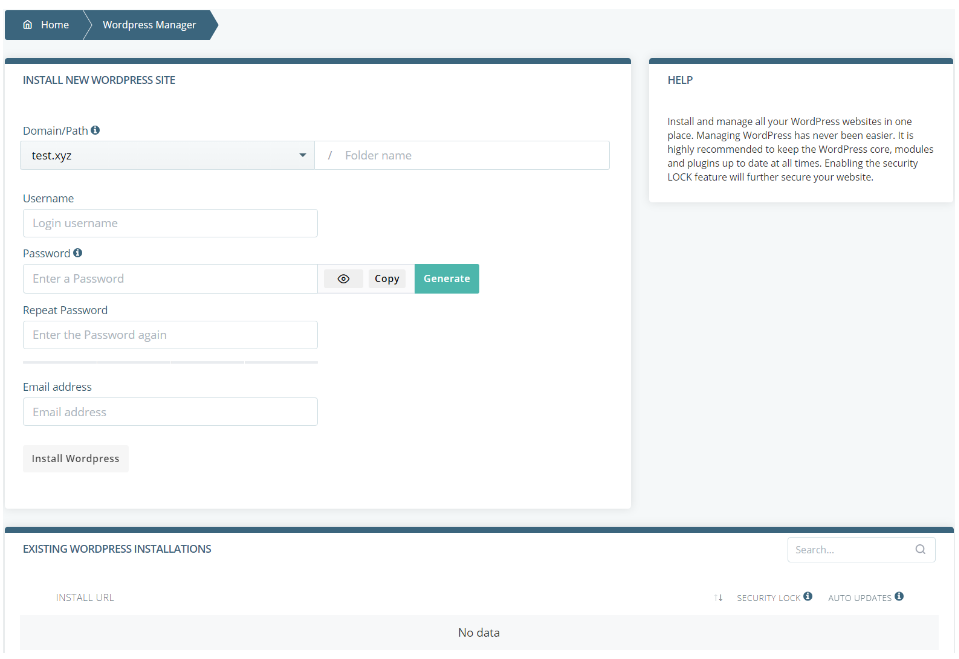
If you plan on using WordPress, it will be easiest to log into the SPanel User Interface, click on the WordPress Manager link and then follow the on-screen instructions to install WordPress with one click. Using the WordPress Manager is important not only because it will save you time during the installation, but also because it will secure your new WordPress installation.
It will perform several specific post-install actions which significantly increase security and which users and sometimes developers neglect or miss out. As a result, their website eventually gets compromised by bots.
The option for automatic updates is really important, as that will keep the WordPress core, plugins and themes up to date and secure at all times.
The Security LOCK feature makes WordPress really hard to hack, as it locks all relevant files and folders to avoid malicious code to be inserted in your website’s files.
If you are uploading your website from scratch via FTP, you must upload all the files in the public_html directory which is the default document root.
If you want to transfer your existing website you should be aware that we can do that for you at no extra cost and with no downtime. The only thing you have to do is to provide us with the login details for your old server.
We’ll use that information to copy all the data including files, databases and emails. Then, we’ll also verify that your website loads correctly from your managed VPS.
After that you can change the nameservers and allow some hours for the changes to take effect globally, so that your website is served by your new managed VPS. We can help you migrate as many websites as you want to your VPS at no additional cost.
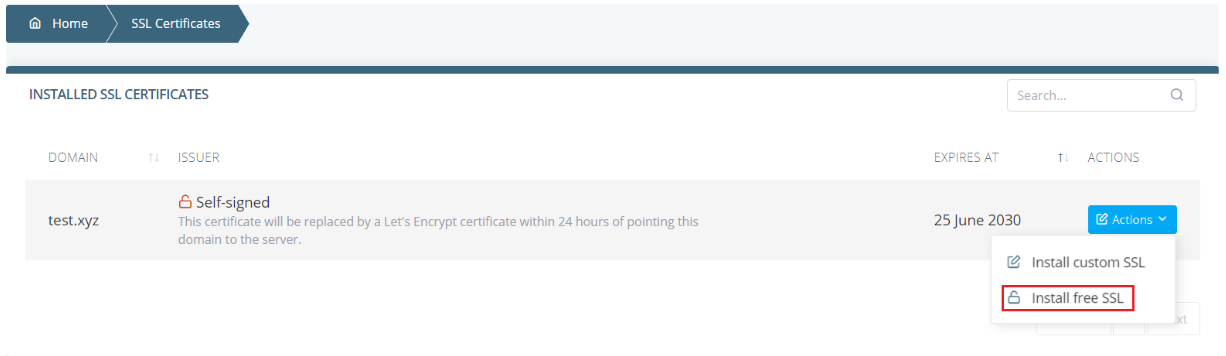
Set up Your Free SSL Certificate
Once you set up your domain name by changing its nameservers and create an account for it in the SPanel Admin Interface, you want to encrypt the connection between your website visitors and the server, as that increases security. Moreover, if you don’t have a SSL certificate installed, your visitors will get a warning in their browsers that your website is not secure.
SPanel checks once per day and automatically issues and installs a free Let’s encrypt SSL certificate for each website. If you are in a hurry and want to install the certificate immediately, you can do so from the SPanel User Interface -> SSL certificates -> Actions -> Install free SSL. Please note that your domain must point to the server before you can install a free SSL.
Set up Your Email
Before you can start sending and receiving emails, you need to create an email box and configure it on your favorite email client. Alternatively, you can use the webmail that is accessible from any browser, anywhere in the world, 24/7/365.
To create an email box, simply log into SPanel User Interface, click on Email accounts and follow the on-screen instructions.
To configure your email in your mail client, use the information below.
POP3/IMAP/SMTP server: mail.yourdomain.com (the option “My SMTP server requires authentication” must be enabled)
Username: enter the whole email address, e.g.: [email protected]
Password: the password you specified when you created the email box
Ports information
- SMTP: 465 (with SSL), 25 (without SSL)
- POP3: 995 (with SSL), 110 (without SSL)
- IMAP: 993 (with SSL), 143 (without SSL)
We recommend configuring your email client with the SSL encrypted ports for maximum security.
You can access your email box via webmail at yourdomain.com/webmail
Getting Support
Your VPS is fully managed and technical support is available 24/7 via the live chat on our website and via tickets opened from your client area at https://my.scalahosting.com to answer any questions you may have.
On both live chat and tickets your issue will be looked into immediately. On the live chat, you instantly get connected to a technical support representative who will receive and answer your questions. The average response time to tickets varies between 5 and 30 minutes depending on the complexity of the issue.
Refer Friends and Get $50 per Signup
Tell your friends about ScalaHosting so they can enjoy the same level of service. You’ll get $50 per signup.
