Launching a new website can be both exciting and stressful. For example, while you’re developing your WordPress project, you get to see your ideas take shape, and you draw a strategy for how your business will grow. However, you don’t want to reveal your plans before you’re completely ready with the website, so the preparation usually happens offline.
Unfortunately, when it comes to bringing the site live, things don’t always go according to plan. Let’s examine the process in more detail and see what you can do to avoid potential setbacks.
What Do You Need to Do to Get Your WordPress Website Live?
Launching any site requires a host for the files and databases and a correctly pointed domain so people can access the web pages from anywhere in the world. Many people try to save a bit of cash by hosting their websites on their home computers.
Indeed, you can theoretically point a domain to your personal PC, but the loopholes you need to go through are so enormously complicated, it’s really not worth the effort. What’s more, you’ll never get the performance you’re after if you host from home.
You’re much better off hosting your website on a proper server situated in a proper data center. There, it will be powered by enterprise-grade hardware providing excellent performance, and people will connect to it via a blistering internet connection, ensuring great loading speeds all over the world.
But if you’ve already developed your WordPress website at home, how do you move it to your hosting account. Well, there are several ways of tackling the job.
Transferring Your Site Manually
This is the most hands-on approach. As we’ll find out in a minute, there are simpler ways of getting a similar result, but if you’re careful, you’re unlikely to get it wrong. At the same time, the process will let you learn more about the tools and systems that power your WordPress site and could help you develop your technical skills. Let’s take a look at the steps.
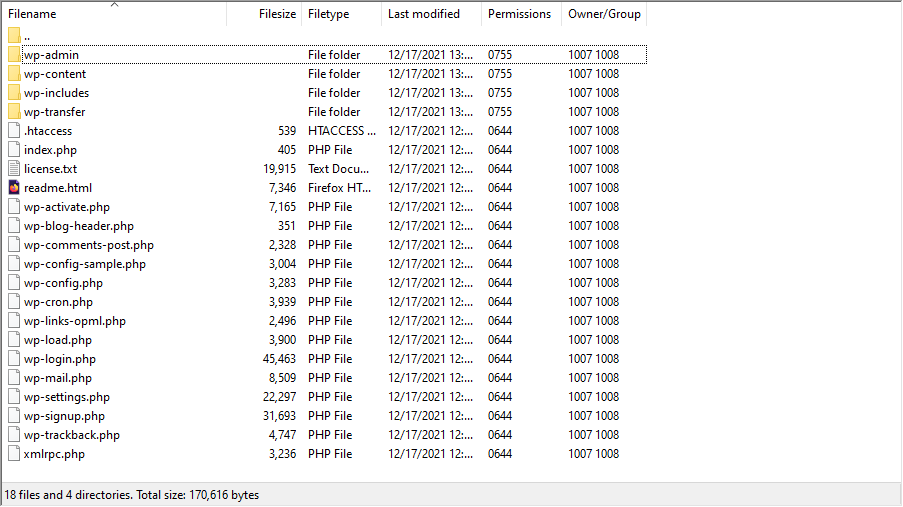
1. Upload your website’s files to your hosting account
This is the most straightforward part of the process. You can use either an FTP client or your control panel’s File Manager to copy your website’s files and folder to your document root directory (usually, the public_html folder).
Make sure you don’t change the folder structure. The files must be arranged as they are on your hard disk.
2. Export your database from localhost
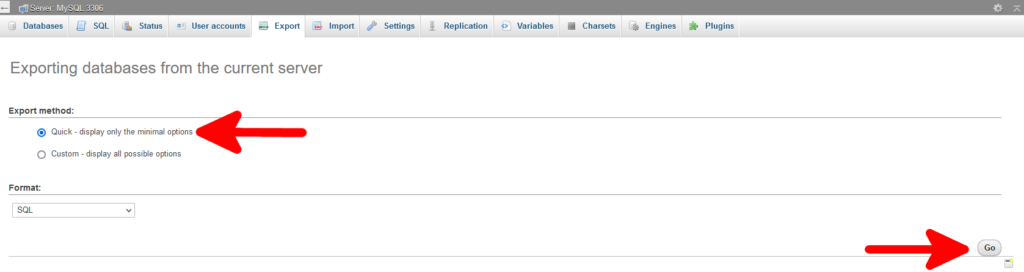
If you’re developing your WordPress website with the help of a platform like the WampServer, you have access to phpMyAdmin – a database management system that, among other things, lets you export and import databases.
To access the functionality, open phpMyAdmin at localhost/phpmyadmin, log in with root as a username and no password, and go to the Export tab. Choose the Quick method, and click Go to save your database on your hard drive.
3. Create a new database and import the data
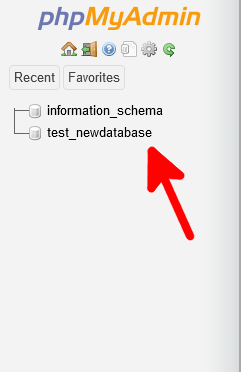
Next, you need to open your hosting account’s control panel. You should have a tool for creating databases. Here, for example, is what you’ll work with if you use ScalaHosting’s SPanel management platform.

You need both a database and a MySQL user account. Later on, WordPress will use this user account to communicate with the database, so it’s essential to keep note of its credentials.
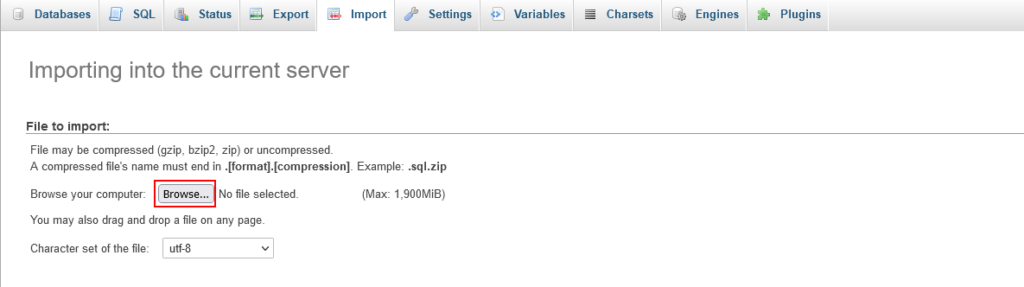
After creating the database, you need to fill it with the data exported from your local computer. To do that, you’ll need phpMyAdmin. It’s usually accessible from your control panel’s homepage. Select the database you’ve just created from the navigation bar on the left, and click the Import tab.
Click the Browse button inside the File to import section to select the SQL file you exported from your localhost installation.
With that, you’ve migrated all your files and data from your personal computer to the hosting server. It’s now time to get them to work together.
4. Edit the wp-config.php file
If you try to load your website at this stage, you’ll see that WordPress is unable to establish a database connection. That’s because the wp-config.php file you copied is still telling it to connect to the database you used on your local computer, not the one you created during the previous step.
You can edit it either via an FTP client, or you can use your control panel’s File Manager to update it straight on the server. Below, you can see the lines you’ll need to update, using the new database’s name and the username and password of the MySQL user account.
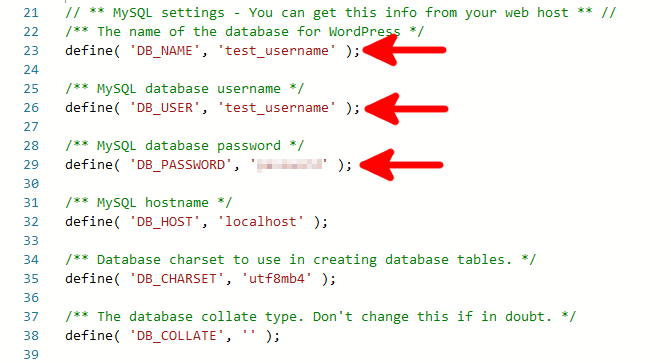
Don’t forget to save the changes and, if you’re using an FTP client, re-upload the file to your site’s document root directory.
5. Configure WordPress to work with your domain name
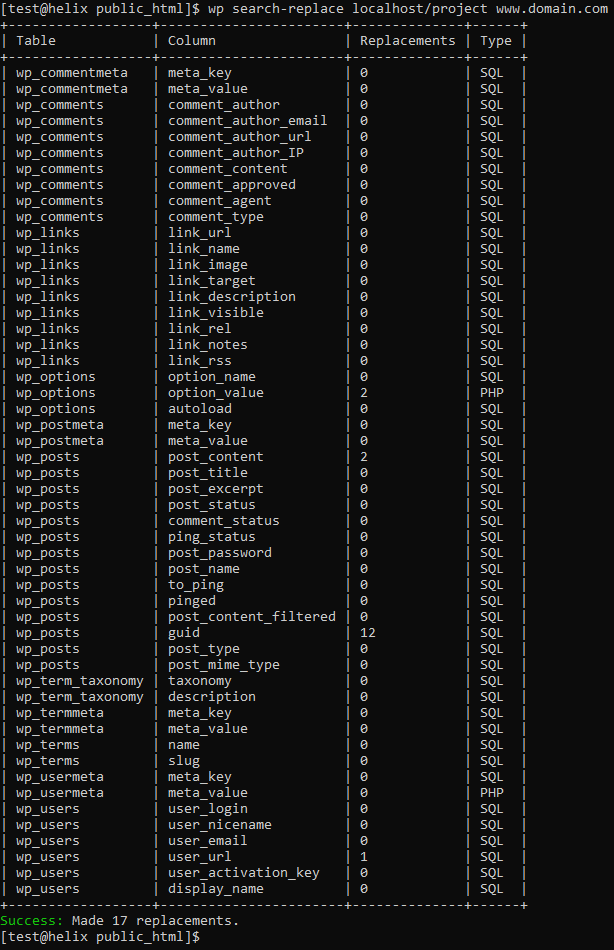
The final job is to make sure your website works with the new domain. Since you’ve been developing it locally, it’s been configured to load under a localhost URL. To make it work with the domain name, you need to update some database entries. The easiest way to do that is with WP-CLI.
WP-CLI is a command-line tool for WordPress that packs many useful features, including the search-replace functionality. With it, you can change the domain name of a WordPress website with a single command.
We’ll assume that the URL you used to develop your website on your personal computer is localhost/project, and your domain is www.domain.com. In that case, the command you’ll need to use is as follows:
wp search-replace localhost/project www.domain.com
You can use the –dry-run parameter to find out exactly what’s going to happen. If you do, WP-CLI will scan your database and show you which entries need to be modified. If you run the command without –dry-run, it will go ahead with the changes.
The site should load normally now. If your links don’t work, you can log into the WordPress dashboard, go to Settings > Permalinks and click Save Changes to rewrite the .htaccess file.
With that, you should be ready to go.
Transferring a WordPress Website Using the Import/Export Features
WordPress has a built-in mechanism for moving data between installations. You need to bear in mind, however, that this is not a complete site migration. With the Export/Import function, you can move all your posts, pages, categories, comments, users, and media files. After they’ve been transferred to the new installation, you’ll need to add the plugins and themes manually.
Let’s see how you can take advantage of this particular feature.
1. Export the data from your local site
Go to Tools > Export inside your local WordPress dashboard. Select All content and click Download Export File.
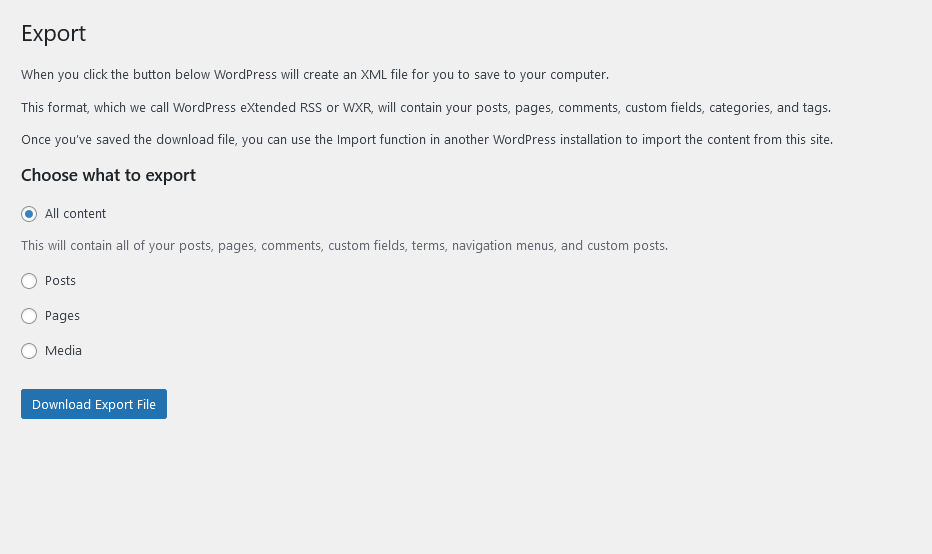
WordPress will generate an XML file with all the data inside it. You need to save it to your computer.
2. Install WordPress on your hosting account
There are many ways to install WordPress on your account. Most probably, the control panel you use has either Softaculous or another automatic installer that can set up the content management system in seconds.
Make sure you don’t add any content to the new installation. Otherwise, you may run into conflicts later on.
3. Import the data into the new installation
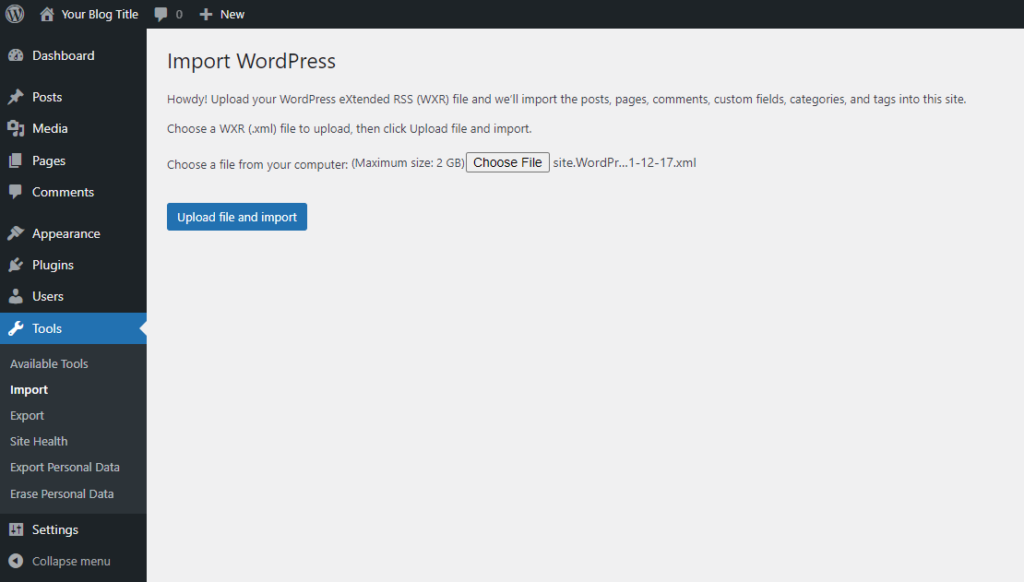
Log into the new installation’s dashboard, and go to. Tools > Import.
This section allows you to import data from many different platforms through add-ons. Since you’re interested in transferring data from one WordPress website to another, you need to click Install Now under the WordPress section.
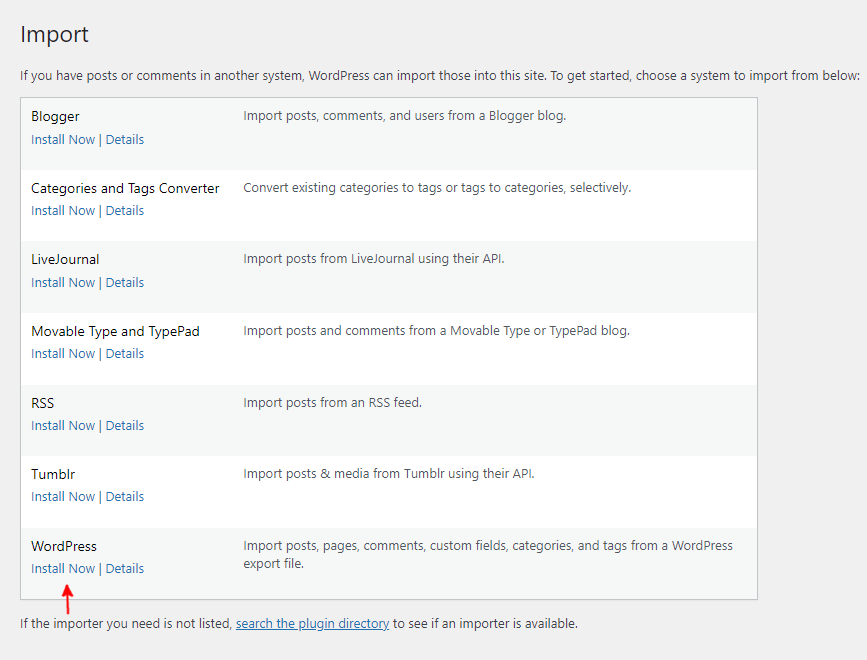
After a few seconds, the additional utility is ready, and you can click Run Importer.
You’ll get a brief explanation of what you’re about to do, and there’s a Choose File button through which you can navigate to and select the XML file you exported from your local site. Click Upload file and import to initiate the process.
Transferring a WordPress Website Using a Plugin
Plugins are a fundamental part of the WordPress ecosystem, so it shouldn’t really be a surprise that there are solutions for transferring a website from one device to another. In fact, there are quite a few WordPress migration plugins, but with over 1 million active installations and predominantly positive reviews, Duplicator seems to be one of the most popular choices. Let’s trace the steps you need to take to transfer your website with it.
1. Install Duplicator on your local website
Duplicator needs to be installed only on your local website. The plugin is a part of WP’s official directory, so the installation process is pretty straightforward.
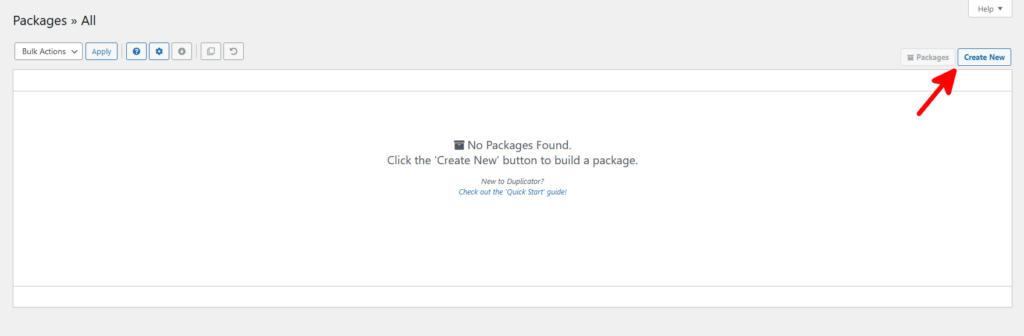
2. Create a package and set it up on your hosting account
Duplicator works by creating the so-called packages – archives full of the site’s data, which you can deploy on a hosting account. The Duplicator menu appears in the WordPress dashboard’s main navigation bar, and from there, you can create and manage packages. You start with the Create New button.
The plugin gives you plenty of options to play with, but since you need to transfer the entire website, you can use the default settings and click Next until the package is created. Click One-Click Download to download both the installer and the archive.
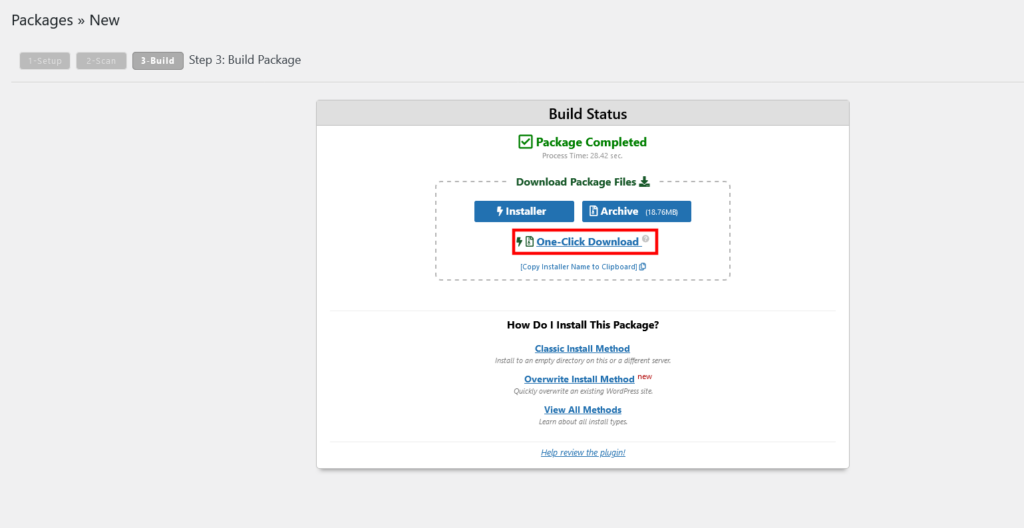
You’ll get two files: installer.php and a ZIP archive full of your data. You can upload them straight to the document root folder of your hosting account.
NOTE: If the transfer is to work, you need to make sure that there’s nothing else in your account’s document root. You DON’T need to install WordPress on your hosting account.
3. Create a database
Duplicator can’t create a database on its own, so you’ll have to do it yourself. Once again, you need both a database and a MySQL user account to access it.
Keep track of the user account’s username and password, as you’ll need them later.
4. Deploy the package
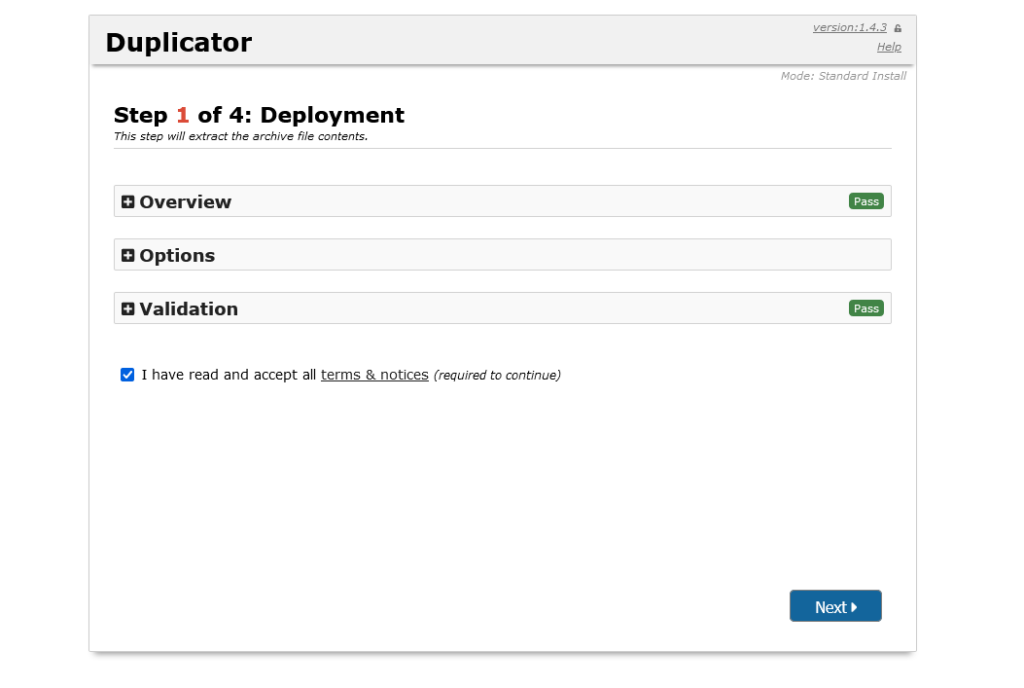
Deploying the Duplicator package takes a few steps, the first of which is to make your way to https://yourdomain.com/installer.php.
During the first step, the installer will perform some checks to make sure the underlying hosting environment is suitable for the WordPress installation. There are some settings, as well, though leaving them in their default state is probably the best strategy.
You also need to accept the Terms of service to continue.
Your next job is to configure the database. You’ll have to enter the database’s name and the MySQL user account’s credentials.
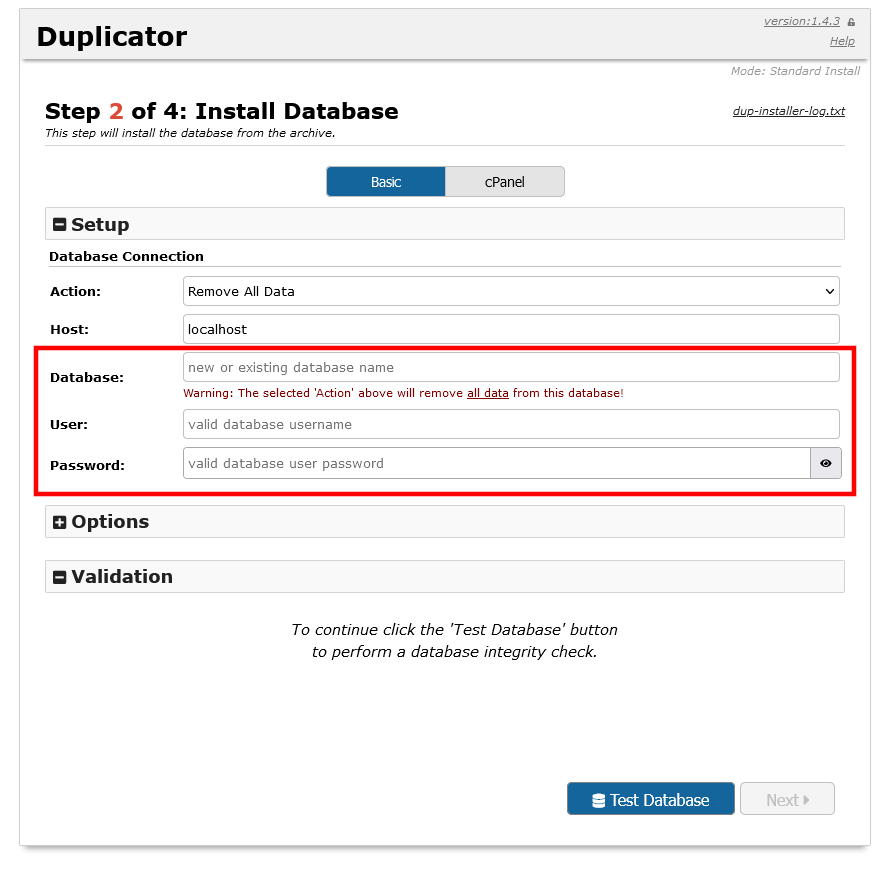
Click Test Database to see if you have entered the correct data. If you have, the Duplicator installer will ask you to confirm the settings, after which it will deploy the installation.
The installer will try to fetch the site URL from your hosting account, but if it’s unable to do so, you’ll need to enter it manually.
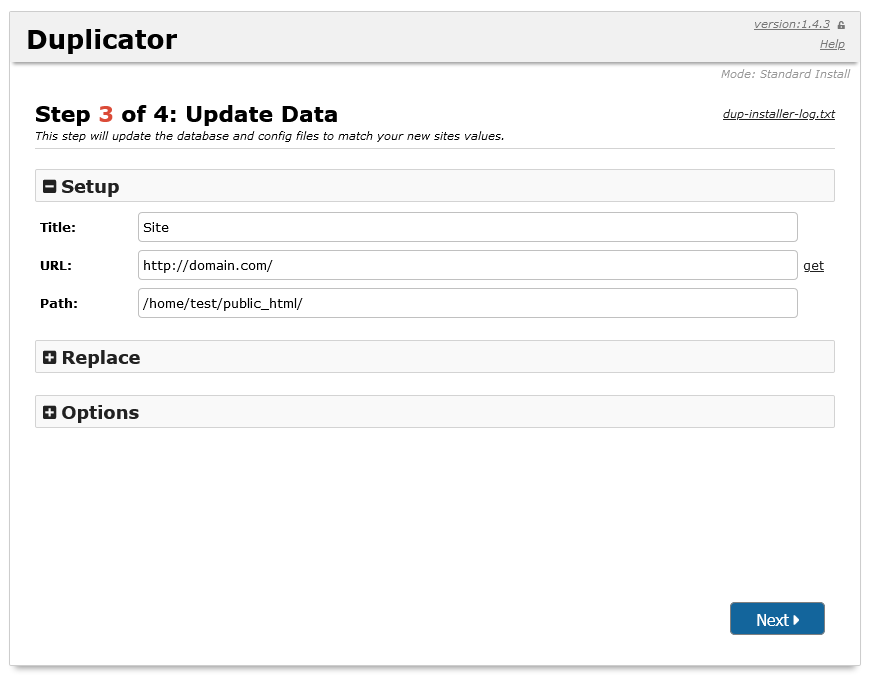
Finally, Duplicator will perform a few checks to ensure everything has gone according to plan. The deployment does leave some installation files behind, and the plugin will ask you to log into your WP dashboard and remove them.
Developing Your Website Directly on Your Hosting Account
You can certainly save some cash by developing your site on your home computer. You only start paying for a hosting service after your site is live, so it’s certainly a good decision budget-wise. However, if your financial restrictions are not that tight, you might want to consider getting a hosting account from the very start.
For one, it will be easier to get going. Most plans come with a control panel and a one-click installer that sets up WordPress in seconds. In some cases, you even get tools to set up a staging environment.
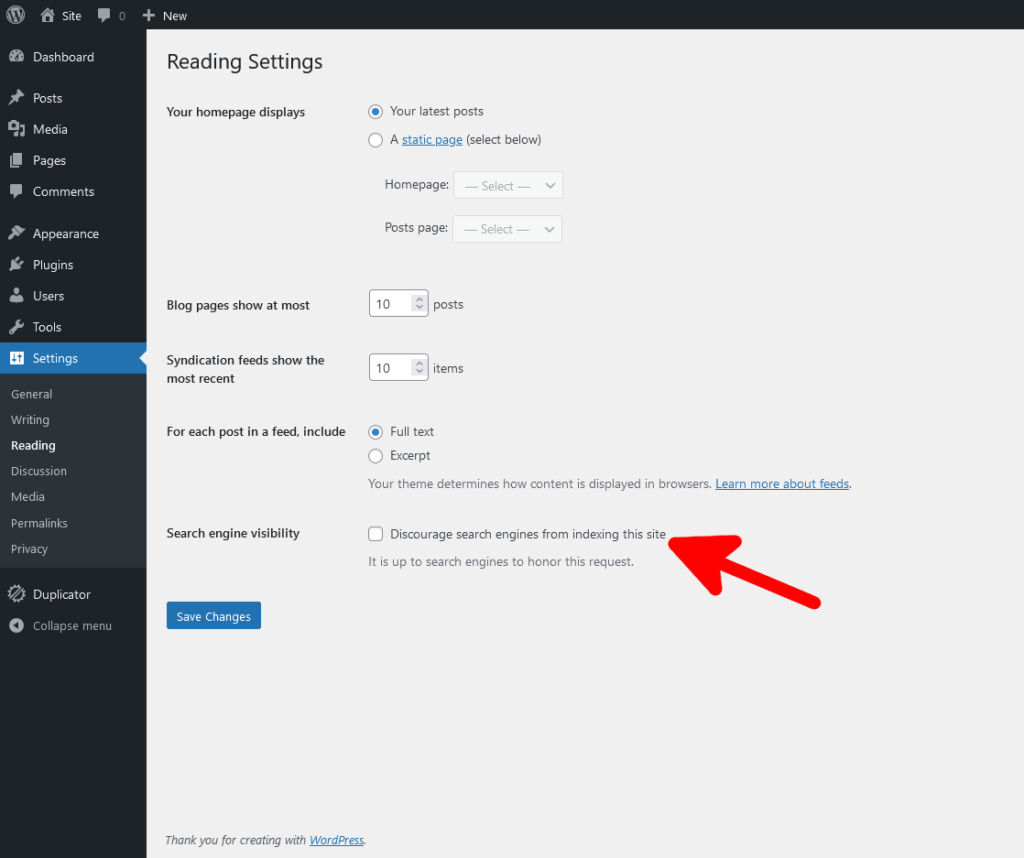
During the installation, you can configure WordPress to discourage search engines from indexing the website. You can also configure the functionality under the Settings > Reading menu in the WP dashboard. Thanks to it, you don’t need to worry about users accidentally stumbling upon your site before it’s ready.
It’s trivial to put up an Under Construction page, and if you don’t want to do that, you can simply point your domain away from your hosting account and work on the site with the help of your hosts file.
While it’s not the cheapest strategy, developing your WordPress project directly on your hosting account can save you some hassle.
