It’s easy to overlook important things when working on a brand new online project. For example, when you’re building your new WordPress site, you may focus all your attention on getting the content and the design right only to forget about WP’s inherent email deliverability issues.
Because of them, critical messages like registration confirmation forms and password reset emails often fail to reach people’s inboxes, leading to a lot of frustration and a bad user experience.
And usually, it all comes down to the fact that, by default, WordPress doesn’t use SMTP.
But can you configure it to work with the protocol? Of course you can. Let’s see how.
What is SMTP, and Why Do You Need It?
Because WordPress is deployed on a wide range of different hosting solutions, the CMS can’t know how each mail server is configured and what settings are required. That’s why by default, WP sends emails through PHP mail() – a PHP function available on all hosting servers. Sometimes, this might just be a good enough solution, but for most people, it causes a couple of problems.
First, the outgoing email communication bypasses the mail server, so it’s not sent over SMTP. SMTP stands for Simple Mail Transfer Protocol, and it’s been the technology we’ve used for sending emails for decades. It’s much more secure than the PHP function, and you can get bounceback messages in case your emails aren’t delivered.
Another problem with php mail() is that, unlike SMTP, it can’t attach SPF and DKIM signatures to your emails. The purpose of the SFP and DKIM records is to assure mail transfer agents and the recipient server that the source of the message is legitimate. Without them, your emails are very likely to be flagged as spam.
That is, if you can send them at all.
Many hosting providers neglect to set up PHP’s mailing function correctly, and some even disable it to prevent abuse and spam, especially on shared hosting platforms.
All in all, SMTP can give you a much more reliable and secure email communication. The only thing you need to do is enable it. You have two options.
Configuring WordPress to Use SMTP Without a Plugin
First, we’ll show you how to configure WordPress to work with SMTP without installing plugins. It may sound a bit technical, but in essence, what we’ll do is insert a couple of code snippets into two of your website’s files – wp-config.php and functions.php.
If you’re going to use your hosting account’s SMTP server, you’ll first need to set up an email address to act as a sender. You’ll need to log into your web hosting control panel and use the available tools to set up a new account.
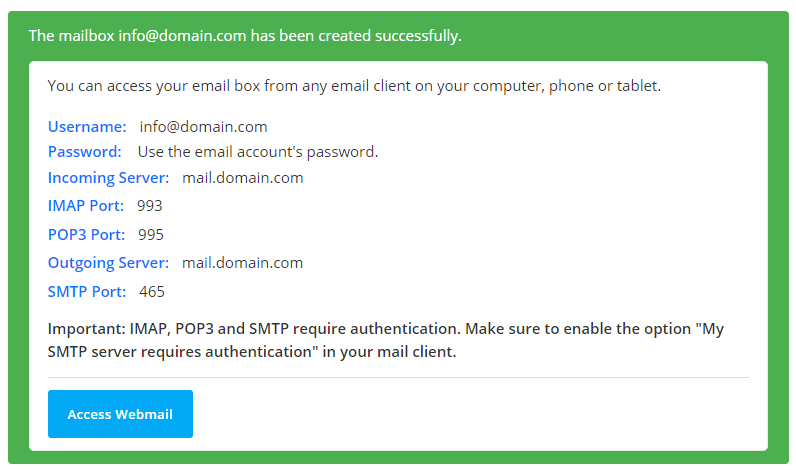
The interface may differ slightly, but you’ll most likely need to fill in a form that looks something like this.

This is the interface users of our SPanel management platform see. After you create the new address, you’ll see a box giving you the information on the inbox’s login credentials, the IMAP/POP3/SMTP servers, and the networking ports.
It’s important to remember the username and password, the outgoing mail server, and the SMTP port, as we’ll need to add them during the next step.
If you’re using a third-party email provider, they should be able to give you the details.
Before we continue, we should probably point out that we’ll now make changes to wp-config.php – WP’s primary configuration file. It might not be a bad idea to back it up just in case (you can download it to your local computer or simply copy it to another folder on your hosting account).
The wp-config file is located in your site’s document root folder (if you host it under the account’s primary domain, it should be in public_html). You can use an FTP client to download it, edit it locally, and then re-upload it, and if you’re comfortable working with the command line, you can also modify it using SSH.
However, most people will find it more convenient to use the web hosting control panel’s File Manager and edit the file on the spot through the browser.
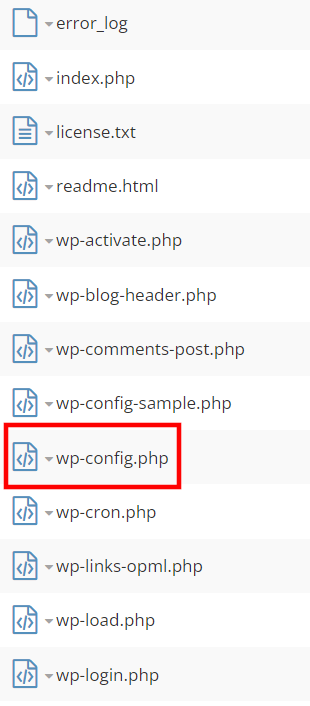
Open the file (by right-clicking and selecting Edit), locate the line that says “/* That’s all, stop editing! Happy publishing. */“, and add the following snippet:
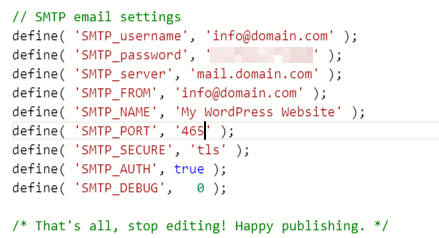
// SMTP email settings
define( ‘SMTP_username’, ‘[your email address]‘ );
define( ‘SMTP_password’, ‘[your email inbox password]‘ );
define( ‘SMTP_server’, ‘[the outgoing or SMTP server]‘ );
define( ‘SMTP_FROM’, ‘[your email address]‘ );
define( ‘SMTP_NAME’, ‘[the name that will appear in the “from” field]‘ );
define( ‘SMTP_PORT’, ‘[the SMTP port]‘ );
define( ‘SMTP_SECURE’, ‘tls’ );
define( ‘SMTP_AUTH’, true );
define( ‘SMTP_DEBUG’, 0 );
Make sure you enter your own SMTP details in the appropriate placeholders. Here’s what the file looks like in our case:
Don’t forget to save your changes before moving on.
We’re putting all this information in the wp-config.php file for security reasons. The file that is actually going to use it is called functions.php, and it’s located in your theme folder.
The problem with editing the functions.php file is that your modifications will be lost as soon as you update your theme. That’s why it’s a good idea to create a child theme first and modify its functions file instead.
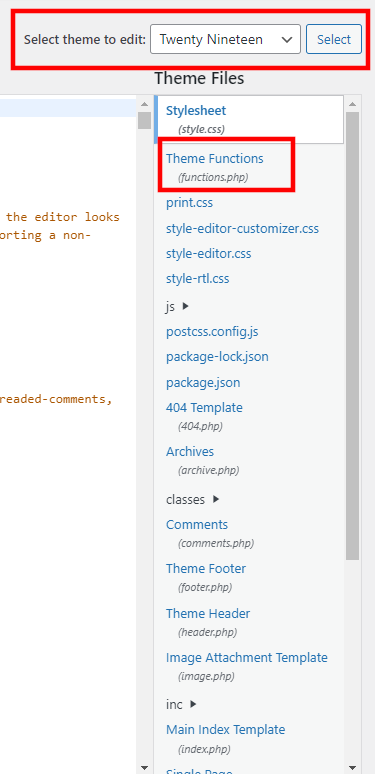
When you’re ready, you can use the File Manager to navigate to wp-content/themes/[the name of your theme] or access the file via the Appearance > Theme File Editor menu in the WP dashboard.
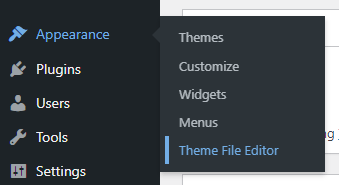
Make sure you’re editing the correct theme, and pick the Theme Functions file from the menu on the right.
Scroll down to the bottom of the file and add the following snippet.
add_action( ‘phpmailer_init’, ‘my_phpmailer_smtp’ );
function my_phpmailer_smtp( $phpmailer ) {
$phpmailer->isSMTP();
$phpmailer->Host = SMTP_server;
$phpmailer->SMTPAuth = SMTP_AUTH;
$phpmailer->Port = SMTP_PORT;
$phpmailer->Username = SMTP_username;
$phpmailer->Password = SMTP_password;
$phpmailer->SMTPSecure = SMTP_SECURE;
$phpmailer->From = SMTP_FROM;
$phpmailer->FromName = SMTP_NAME;
}
The code above calls the PHPMailer library and configures it to work with the SMTP settings you added to the wp-config.php file.
After you save the changes to the theme function file, WordPress will be configured to work with your SMTP server.
Configuring WordPress to Use SMTP With a Plugin
If all this sounds too complicated for you, you can opt for the more user-friendly method and use a plugin to dispatch WordPress emails through SMTP. There’s certainly no shortage of options.
In fact, searching for “SMTP” in the official WordPress repository returns quite a few results. It’s up to you to have a good look at them and decide which one fits your requirements.
